Greenplum(即 Green Plum,青梅)是一个基于 MPP 体系结构和 PostgreSQL 数据库的开源 OLAP 服务,本文主要记录下个人在安装和调试 Greenplum 所遇到的问题以及发现的好用的工具,以帮助后面的小伙伴儿少走一些弯路。
1. 安装 Greenplum Database
Greenplum Database 目前存在 2 个核心版本,一个是稳定的 6X 版本(使用 PostgreSQL 9.4.24),另一个则是 7.0.0-alpha(使用 PostgreSQL 12beta2)。在生产环境中通常使用 6X-STABLE 版本,其代码经过了多番打磨和锤炼,虽然功能特性要少于 7.0.0-alpha,但是胜在稳定。
1.1 Ubuntu 20.04 安装 6X_STABLE
如果需要在 6X_STABLE 版本中使用 GPORCA 的话,那么就需要手动编译并安装 gp-xerces,apt-get 安装的 xerces 版本过高,无法使用。
git clone git@github.com:greenplum-db/gp-xerces.git
cd gp-xerces
mkdir build && cd build
../configure --prefix=/usr/local
make -j 8
sudo make -j 8 install
Ubuntu 20.04 默认使用 Python3,而 GPDB6 依赖于 Python2,所以得安装 Python2
apt-cache search python     # search 一下会更好一些
sudo apt-get install python2
sudo apt-get install python2-dev
安装所需其他依赖:
sudo ./README.ubuntu.bash
调整内核参数:
sudo bash -c 'cat >> /etc/sysctl.conf <<-EOF
kernel.shmmax = 500000000
kernel.shmmni = 4096
kernel.shmall = 4000000000
kernel.sem = 500 1024000 200 4096
kernel.sysrq = 1
kernel.core_uses_pid = 1
kernel.msgmnb = 65536
kernel.msgmax = 65536
kernel.msgmni = 2048
net.ipv4.tcp_syncookies = 1
net.ipv4.ip_forward = 0
net.ipv4.conf.default.accept_source_route = 0
net.ipv4.tcp_tw_recycle = 1
net.ipv4.tcp_max_syn_backlog = 4096
net.ipv4.conf.all.arp_filter = 1
net.ipv4.ip_local_port_range = 1025 65535
net.core.netdev_max_backlog = 10000
net.core.rmem_max = 2097152
net.core.wmem_max = 2097152
vm.overcommit_memory = 2

EOF'

sudo bash -c 'cat >> /etc/security/limits.conf <<-EOF
* soft nofile 65536
* hard nofile 65536
* soft nproc 131072
* hard nproc 131072

EOF'
将 /usr/local/lib 此路径加入至链接时的搜索路径
sudo bash -c 'cat >> /etc/ld.so.conf <<-EOF
/usr/local/lib

EOF'
安装 GPDB
# 处理 python 依赖
pip install -r python-dependencies.txt

./configure --with-perl --with-python --with-libxml --with-gssapi --enable-orca --prefix=/usr/local/gpdb

make -j 8 -s
sudo make -j 8 install
1.2 可能出现的问题
1.2.1 no module named psutil:
原因在于虽然我们安装了 python2,但是 pip 却是 Python3.8 版本的,也就是说,所有通过 pip install 的 Package 均属于 Python3,而不是 GPDB 6X 所依赖的 Python2 版本。因此,我们得安装一个 python2 pip:
curl https://bootstrap.pypa.io/pip/2.7/get-pip.py --output get-pip.py
sudo python get-pip.py
紧接着再去安装相关的依赖,包括 psutil、pyyaml 等。
1.2.2 fatal error: uv.h: No such file or directory
sudo apt-get install libuv1-dev
1.2.3 The pkg-config script could not be found or is too old.
sudo apt-get install pkg-config
1.2.4 Value en_US.UTF-8 is not a valid value for –lc-ctype on this system.
export LC_CTYPE=C
export LC_ALL=C
1.2.5 gdb 使用 gdbpg.py 调试 gpdb 的导致 Abort 的问题
gdb 版本过高,手动编译 8.3 版本即可。
https://ftp.gnu.org/gnu/gdb/
./configure --with-python=/usr/bin/python3
make -j 8 -s
sudo make -j 8 -s install
在安装过程中可能会出现 makeinfo: not found 的错误,此时安装一下 textinfo 即可:
sudo apt-get install texinfo
2. 集群的启动
make create-demo-cluster
# 不添加 mirrors 节点
make create-demo-cluster WITH_MIRRORS=false
3. GPDB 的调试
GPDB 本身其实是一个 Master-Segment 架构。Master 节点属于协调者,不保存任何用户数据,是整个数据库集群的大脑。Segment 则是实际的 Worker 节点,参与数据的存储和计算,将 SQL 的执行结果发送给 Master 节点:
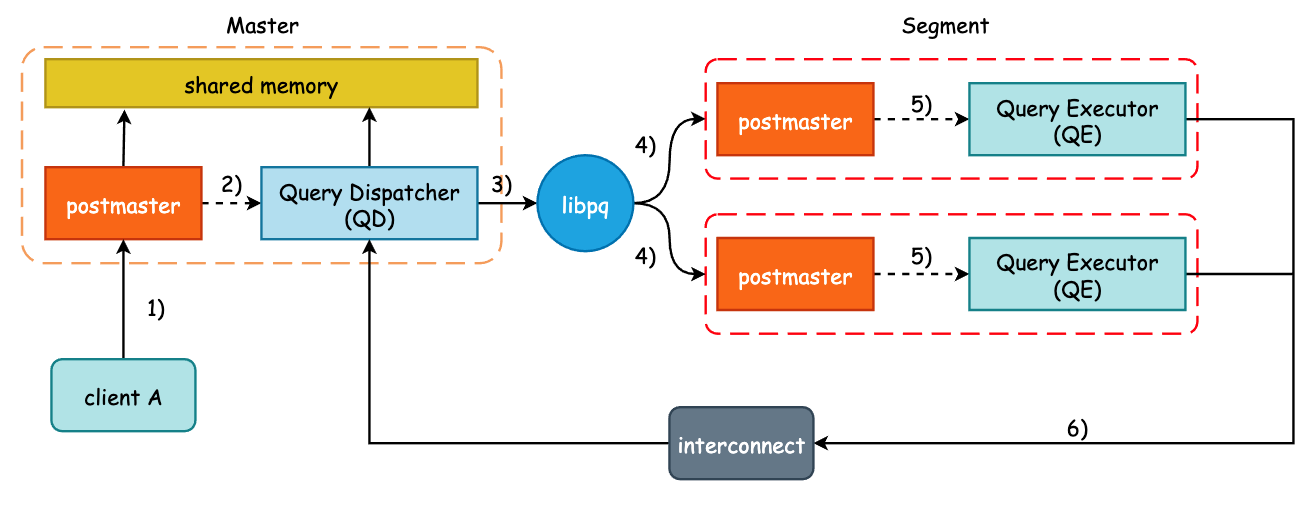
因此也就有 QD(Query Dispatcher)和 QE(Query Executor) 之分,实际上就是 Master 和 Segment 的具体进程,我们可以通过 ps aux | grep "postgres -D" 来查看 Demo Cluster 中的 QD 和 QE 进程。
在一般的查询处理过程中,用户将会和 Master 节点建立连接,并且 Master 会 fork 出一个子进程(QD)来专门处理该客户端的所有命令。QD 进程会对收到的查询请求进⾏处理,包括解析原始查询语句、优化器优化以及⽣成分布式查询计划,然后将查询计划发送给其它的 Segment 节点。因此,当我们需要查看某一条 SQL 的查询树或者是查询计划时,就可以将断点达到 QD 进程上:
smart@stable:~$ ps aux | grep postgres | grep 'con[0-9]'
smart    1457314  0.0  ?  Ssl  11:35   postgres:  6000, smart postgres [local] con21 cmd29 idle
smart    1497753  0.0  ?  SNsl 15:51   postgres:  6002, smart postgres 127.0.0.1(32279) con21 seg0 idle
smart    1497754  0.0  ?  SNsl 15:51   postgres:  6003, smart postgres 127.0.0.1(30243) con21 seg1 idle
smart    1497755  0.0  ?  SNsl 15:51   postgres:  6004, smart postgres 127.0.0.1(45443) con21 seg2 idle
如上所示,1457314 即为 QD 进程,而 1497753、1497754 以及 1497755 均为 QE 进程,因此执行:
smart@stable:~$ gdb -p 1497755 -q
Attaching to process 1497755
[New LWP 1497758]
[Thread debugging using libthread_db enabled]
Using host libthread_db library "/lib/x86_64-linux-gnu/libthread_db.so.1".
__libc_recv (flags=<optimized out>, len=8192, buf=0x56093106fb20 <PqRecvBuffer>, fd=10) at ../sysdeps/unix/sysv/linux/recv.c:28
28      ../sysdeps/unix/sysv/linux/recv.c: No such file or directory.
(gdb) b exec_simple_query
Breakpoint 1 at 0x560930290e1a: file postgres.c, line 1590.
PS:若 gdb -p 抛出 Operation not permitted 的错误,那么就将配置文件 /etc/sysctl.d/10-ptrace.conf 中的 kernel.yama.ptrace_scope 修改为 0,并重启系统。
当我们不知道将断点打到何处时,就可以使用 exec_simple_query 这一万能断点,不管是 DML 还是 DDL,都是同一个入口函数。以 select * from t 这一 SQL 为例:
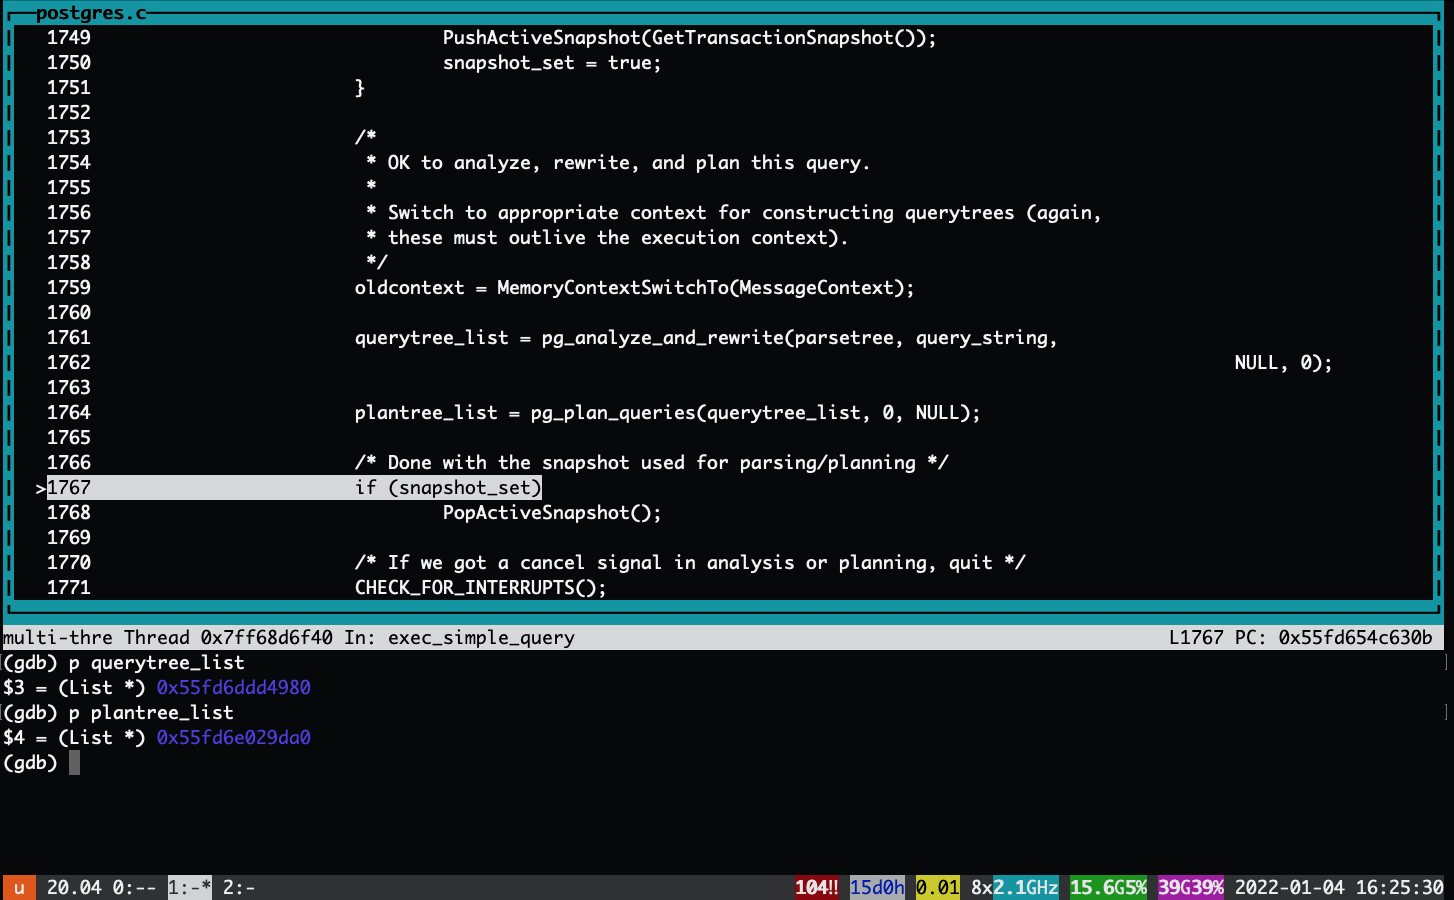
此时,querytree_list 即为 SQL 的查询树结果,plantree_list 则保存了生成的“代价”最小的查询树。
除此之外,我们可以使用 gdbpg 这个 Python 脚本来快速打印出 PostgreSQL 中的节点类型:
(gdb) pgprint querytree_list
Query [commandType=CMD_SELECT querySource=QSRC_ORIGINAL queryId=0 canSetTag=true resultRelation=0 parentStmtType=0 '\000']
        [rtable]
                RangeTblEntry [rtekind=RTE_RELATION relid=24576 relkind='r' jointype=JOIN_INNER funcordinality=false ctelevelsup=0 self_reference=false forceDistRandom=false
                               lateral=false inh=true inFromCl=true requiredPerms=2 selectedCols=0x00000400 modifiedCols=0x0]
        [jointree]
                FromExpr []
                        [fromlist] RangeTblRef [rtindex=1]
        [targetList]
                TargetEntry [resno=1 resname="a" resorigtbl=24576 resorigcol=1]
                        Var [varno=1 varattno=1 vartype=23 varnoold=1 varoattno=1]
而对于 QE 来说,其入口函数通常为 exec_mpp_query,而不是 exec_simple_query,因此若想要对 QE 添加断点的话,就可以首先加在该函数之上。
4. 附录: 一些相当实用的一些 alias 和脚本
对于 ./configure 以及 make create-demo-cluster 这样的常用命令,我们可以使用 alias 的方式将其写入到 .bashrc 中,减少一些重复性的体力劳动。
/usr/local/bin/planner_config
#!/bin/bash

./configure --with-perl --with-python --with-libxml --with-gssapi --enable-debug --enable-cassert --prefix=/home/smart/libary/gpdb

sed -i 's/-O3/-O0/g' src/Makefile.global
/usr/local/bin/rg
#!/bin/bash

if [ "off" = "$2" ]; then
    PGOPTIONS='-c optimizer=off' ./pg_regress --init-file=init_file $1
else
    PGOPTIONS='-c optimizer=on' ./pg_regress --init-file=init_file $1
fi
.bashrc
alias gpdb="cd ~/workspace/gpdb"
alias sgpdb="source /home/smart/libary/gpdb/greenplum_path.sh"
alias sgpdemo="source ~/workspace/gpdb/gpAux/gpdemo/gpdemo-env.sh"
alias pp="ps aux | grep postgres"
alias ppc="ps aux | grep postgres | grep 'con[0-9]'"
alias create-demo-cluster="gpdb && make create-demo-cluster WITH_MIRRORS=false"
export PATH=$PATH:/home/smart/libary/