位图(bitmap)索引是 Greenplum 中所特有(对比 PostgreSQL)的一种索引类型,非常适用于大数据量且数据修改需求不大的数据分析场景(OLAP)中使用。Bitmap 索引可以保证在提供优良查询速度的前提下,使用更小的空间开销,能够有效节省大数据量环境的硬盘空间使用,从而降低系统运行成本。
1. 什么是 Bitmap Index?
Bitmap Index 非常类似于 Reverted Index (转置索引,或倒排索引),是一种反向索引,使用位图(bitmap)结构来记录某个唯一 Key 在表中的所有位置。通过读取该位图索引,即可一次性获得查询键的所有出现位置。
以下表为例,这是一张人物表,由 ID,姓名,性别和工作城市组成:
| ID | Name | Sex(M-男,F-女) | City |
|---|---|---|---|
| 1 | Mick | M | Shanghai |
| 2 | Jim | M | Beijing |
| 3 | Tom | M | Beijing |
| 4 | Steve | M | Chengdu |
| 5 | Kate | F | Beijing |
| 6 | Mary | F | Chengdu |
| 7 | Bob | M | Shenzhen |
| 8 | Lucy | M | Chengdu |
如果我们在 Sex 列和 City 列上建立 Bitmp 索引的话,则会抽取该列所有的唯一值,并使用 bitmap 记录下其出现的位置:
Sex-M: 11110011
Sex-F: 00001100

City-Shanghai: 10000000
City-Beijing:  01101000
City-Chengdu:  00010101
City-Shenzhen: 00000010
以 Sex-F 为例,女性员工只出现在了第 5 行和第 6 行,因此在位图中只有第 5 个和第 6 个 bit 被置为 1, 其余位则为 0, 表示这些位置所保存的 tuple 的性别均为非女性。
当我们查找在北京工作的女性员工:
select name from person where city = 'beijing' and sex = 'F';
Bitmap 索引即可直接将这 2 个查询值所对应的 bitmap 索引项进行求交集操作,一次性得到所有符合查询条件的 tuple 位置位图:
City-Beijing & Sex-F = 01101000 & 00001100 = 00001000
因此,符合查询条件的数据只有 1 条,并且是第 5 条数据 (ID=5)。
Bitmap 索引的每一位 (bit) 都按序对应了表中的一个数据元组,如果该位被设置,则对应的数据元组匹配该键值。另外 Bitmap 索引对于在 where 子句中包含多个条件的查询非常有效: 只满足部分查询条件的数据元组在访问数据表之前就会被过滤掉,这大大提升了查询的运行速度。
因此,相较于传统的 B-Tree 索引而言,当索引建的唯一值数量在 100 到 10000 时,Bitmap Index 将会有更好的性能表现。我们可以通过下面这个简单的例子来对比 B-Tree Index 和 Bitmap Index:
首先建立完全相同的两张表,该表上具有 4 个字段: id 为主键;msg 字段存储随机字符串;foo 字段则随机填入 [0, 100) 之间的整数,bar 字段则随机填入 [0, 1000) 之间的整数。插入测试数据后分别在 foo 字段上和 bar 字段上建立 B-Tree 索引和 Bitmap 索引:
create table test_bitmap(
    id int, msg text, foo int, bar int
) distributed by (id);

insert into test_bitmap (id, msg, foo, bar)
select g, md5(g::text), random() * 100, random() * 1000 from generate_series(1, 10000000) g;

create table test_btree(
    id int, msg text, foo int, bar int
) distributed by (id);
insert into test_btree select * from test_bitmap;

-- create index
create index on test_bitmap using bitmap(foo);
create index on test_bitmap using bitmap(bar);

create index on test_btree using btree(foo);
create index on test_btree using btree(bar);
而后,我们分别在 test_bitmap 和 test_btree 上运行相同的查询:
postgres=# explain (analyze, costs off) select * from test_bitmap where foo = 52 or bar = 520;
                                              QUERY PLAN
------------------------------------------------------------------------------------------------------
 Gather Motion 3:1  (slice1; segments: 3) (actual time=5.303..987.683 rows=110011 loops=1)
   ->  Bitmap Heap Scan on test_bitmap (actual time=1.176..1052.844 rows=36869 loops=1)
         Recheck Cond: ((foo = 52) OR (bar = 520))
         ->  BitmapOr (actual time=0.888..0.895 rows=1 loops=1)
               ->  Bitmap Index Scan on test_bitmap_foo_idx (actual time=0.634..0.641 rows=1 loops=1)
                     Index Cond: (foo = 52)
               ->  Bitmap Index Scan on test_bitmap_bar_idx (actual time=0.237..0.260 rows=1 loops=1)
                     Index Cond: (bar = 520)
 Planning Time: 0.207 ms
   (slice0)    Executor memory: 34K bytes.
   (slice1)    Executor memory: 2167K bytes avg x 3 workers, 2167K bytes max (seg0).
 Memory used:  128000kB
 Optimizer: Postgres query optimizer
 Execution Time: 1420.923 ms
(14 rows)

postgres=# explain (analyze, costs off) select * from test_btree where foo = 52 or bar = 520;
                                                 QUERY PLAN
-------------------------------------------------------------------------------------------------------------
 Gather Motion 3:1  (slice1; segments: 3) (actual time=195.580..1272.439 rows=110011 loops=1)
   ->  Bitmap Heap Scan on test_btree (actual time=219.470..1352.689 rows=36869 loops=1)
         Recheck Cond: ((foo = 52) OR (bar = 520))
         Rows Removed by Index Recheck: 1740525
         ->  BitmapOr (actual time=216.796..216.803 rows=1 loops=1)
               ->  Bitmap Index Scan on test_btree_foo_idx (actual time=180.544..180.552 rows=33551 loops=1)
                     Index Cond: (foo = 52)
               ->  Bitmap Index Scan on test_btree_bar_idx (actual time=30.162..30.169 rows=3351 loops=1)
                     Index Cond: (bar = 520)
 Planning Time: 0.224 ms
   (slice0)    Executor memory: 98K bytes.
   (slice1)    Executor memory: 197132K bytes avg x 3 workers, 197132K bytes max (seg0).
 Memory used:  128000kB
 Optimizer: Postgres query optimizer
 Execution Time: 1726.559 ms
(15 rows)
可以看到,在相同数据并且具有相同的查询下,Bitmap Index 要比 B-Tree Index 更快返回结果。同时,Bitmap Index 将占据更小的磁盘空间:
postgres=# \di+ test_bitmap_foo_idx
                                 List of relations
 Schema |        Name         | Type  | Owner |    Table    |  Size  | Description
--------+---------------------+-------+-------+-------------+--------+-------------
 public | test_bitmap_foo_idx | index | smart | test_bitmap | 102 MB |
(1 row)

postgres=# \di+ test_btree_foo_idx
                                List of relations
 Schema |        Name        | Type  | Owner |   Table    |  Size  | Description
--------+--------------------+-------+-------+------------+--------+-------------
 public | test_btree_foo_idx | index | smart | test_btree | 213 MB |
(1 row)
2. Bitmap Index 存储结构
从原理上来看,Bitmap Index 非常简单。当建立 Bitmap Index 时只需要遍历该列的所有数据,并对所有的唯一值都建立一个位图即可。在查询时,也只需要根据查询的键值找到对应的位图,并逐一读取至内存中。
但是 Bitmap 索引的总体大小是取决于相关数据列上唯一值的数目和总数据的个数,假如说我们在一个邮编列(约 10 万唯一值)上创建索引,当数据量为 1000 万时,朴素实现的 Bitmap 索引将占据 100000 * 1000000 / 8 = 125G 空间,这是一个非常庞大的空间开销。因此,我们必须要对 bitmap 进行压缩,以减少硬盘空间的使用。同时我们也将会看到,正是因为有了 bitmap 的压缩,才使得 Bitmap 索引在实现上有着极高的复杂度。
2.1 HRL 压缩编码
Greenplum Bitmap 索引中的位图采用了 HRL (Hybrid Run Length) 编码方法进行存储。在 HRL 编码中,bitmap 位图被划分成 2 部分: 头信息部分(Header)和值部分(Content)。
头信息中的每一个 bit 表示了值部分对应的“字”是否被压缩,1 表示压缩,0 则表示未压缩。
值部分则存储了压缩字和非压缩字。对于压缩字而言,它的第一位表示了压缩前的值是 0 还是 1,其余各位表示了压缩前的值的原始长度(长度单位为 1 个字长)。
假设我们的字长为 8 位,来看一个实际的例子:
00000000 0000000 01000000 01110100 11111111 11111111 11111111
上述 bitmap 采用 HRL 编码后的结果为:
Header Section:  1001
Content Section: 00000010 01000000 01110100 10000011
HRL 会对连续的 11111111 或者 00000000,即一个字长的全 1 或者全 0 进行压缩。根据 Header 信息可知 Content 部分的第 1 个和第 4 个字是压缩的,其余字是非压缩的。第 1 个压缩字的首位为 0,其余位的值为 2,因此表示压缩了 2 个 00000000。而第 2 个压缩字的首位为 14,其余位的值为 3,因此表示压缩了 3 个 11111111。 Content 中的其余的非压缩字即表示原有数据,无需额外处理。

由此可见,对于具有大量的连续 0 或者 1 的 bitmap 向量,HRL 编码将具有非常好的压缩效果。而在具体的实现中,Greenplum 的一个字长为 64 位,即对于一个压缩字来说,可以表示 $2^{63}$ 个长度为 64 的连续 1 或者是连续 0,这足以覆盖现实情况的全部场景。
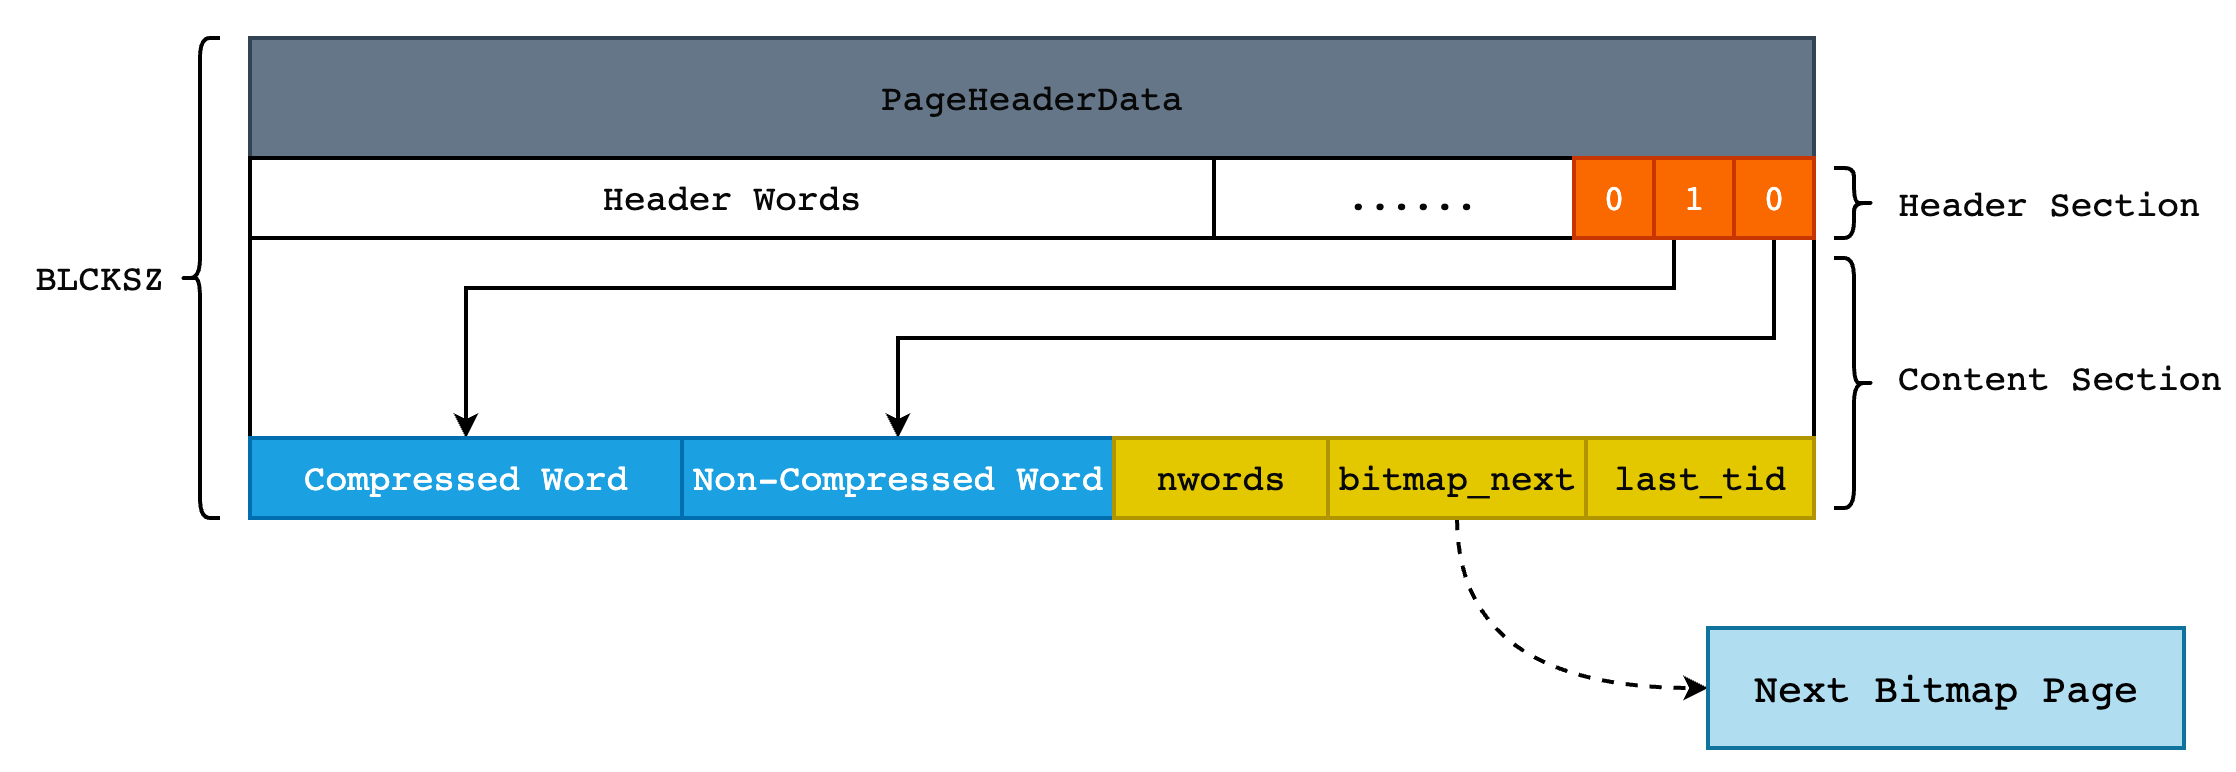
2.2 索引存储结构
在 Greenplum 中,不管是索引数据还是表数据,都是按页进行存储的,Bitmap 索引也不例外。在实际的存储中,数据以 HRL 编码的方式存储在每一页中。同时由于一个 bitmap 可能非常长,一个 Page 无法保存,因此需要将较长的 bitmap 拆分成较小的 bitmap,并以链表的方式进行链接。
因此一个 Page 除了 PostgreSQL 标准的 PageHeaderData 之外,还需要额外的保存下一个 Page 的指针,以及当前 Page 到底保存了多少个 Word,以此来区分 Header 部分和 Content 部分。这部分的信息封装在 BMBitmapOpaqueData 中:
typedef struct BMBitmapOpaqueData  {
	uint32		bm_hrl_words_used;      /* 当前 page 保存了多少个 words */
	BlockNumber	bm_bitmap_next;         /* 下一页的指针,即 Block Number */
	uint64		bm_last_tid_location;   /* 当前页最后一个 bit 所表示的 TID Location */
} BMBitmapOpaqueData;
typedef BMBitmapOpaqueData *BMBitmapOpaque;
这里需要对 TID Location 解释一下。在前面的例子中,我们都在使用第几个第几个数据,比如对于 00010001 来说,第 4 个和第 8 个数据符合要求。但是在实际的 Heap Table 中,tuple 是无序存储的,并且一个 Heap Page 中存储的 tuple 数量也不确定,因此没有办法在 Bitmap Index 中使用“第几个 tuple”这样的表示方法。而唯一能够确定一个 tuple 位置的就只有 TID 了,即 (BlockNumber, Offset)。所以,我们使用如下公式将二维的 TID 转换成一维的 TID Location,并以此作为该 tuple 在 Bitmap Vector 中的具体位置:
TID Location = BlockNumber * BM_MAX_TUPLES_PER_PAGE + Offset
现在来看看 Bitmap Index Page 样子,一共可划分为 4 部分:
- PostgreSQL 标准 Page Header (包含 LSN、校验和等信息);
- HRL 压缩编码的 Header Section;
- HRL 压缩编码的 Content Section;
- Sepcial 数据,保存了下一个 Page 指针和当前 Page 保存的 words 个数,封装在 BMBitmapOpaqueData 中。
程序使用 read_words() 这一方法将 Bitmap Index Page 中的内容读取到结构体 BMBitmapOpaque 和 BMBitmap 中。BMBitmapOpaque 前面已经介绍过,不再赘述。BMBitmap 只有两个字段,即 Header 和 Content:
/* A page of a compressed bitmap */
typedef struct BMBitmapData {
	BM_HRL_WORD hwords[BM_NUM_OF_HEADER_WORDS];
	BM_HRL_WORD cwords[BM_NUM_OF_HRL_WORDS_PER_PAGE];
} BMBitmapData;
typedef BMBitmapData *BMBitmap;
Bitmap Index Page 同样受 BufferPool 的管理,即读取数据时首先将磁盘上的页读取至 BufferPool 中,然后再从 BufferPool 中获取数据。更新索引时也首先更新 Buffer Page,写入 WAL 日志后再由系统决定何时 flush 到硬盘中。
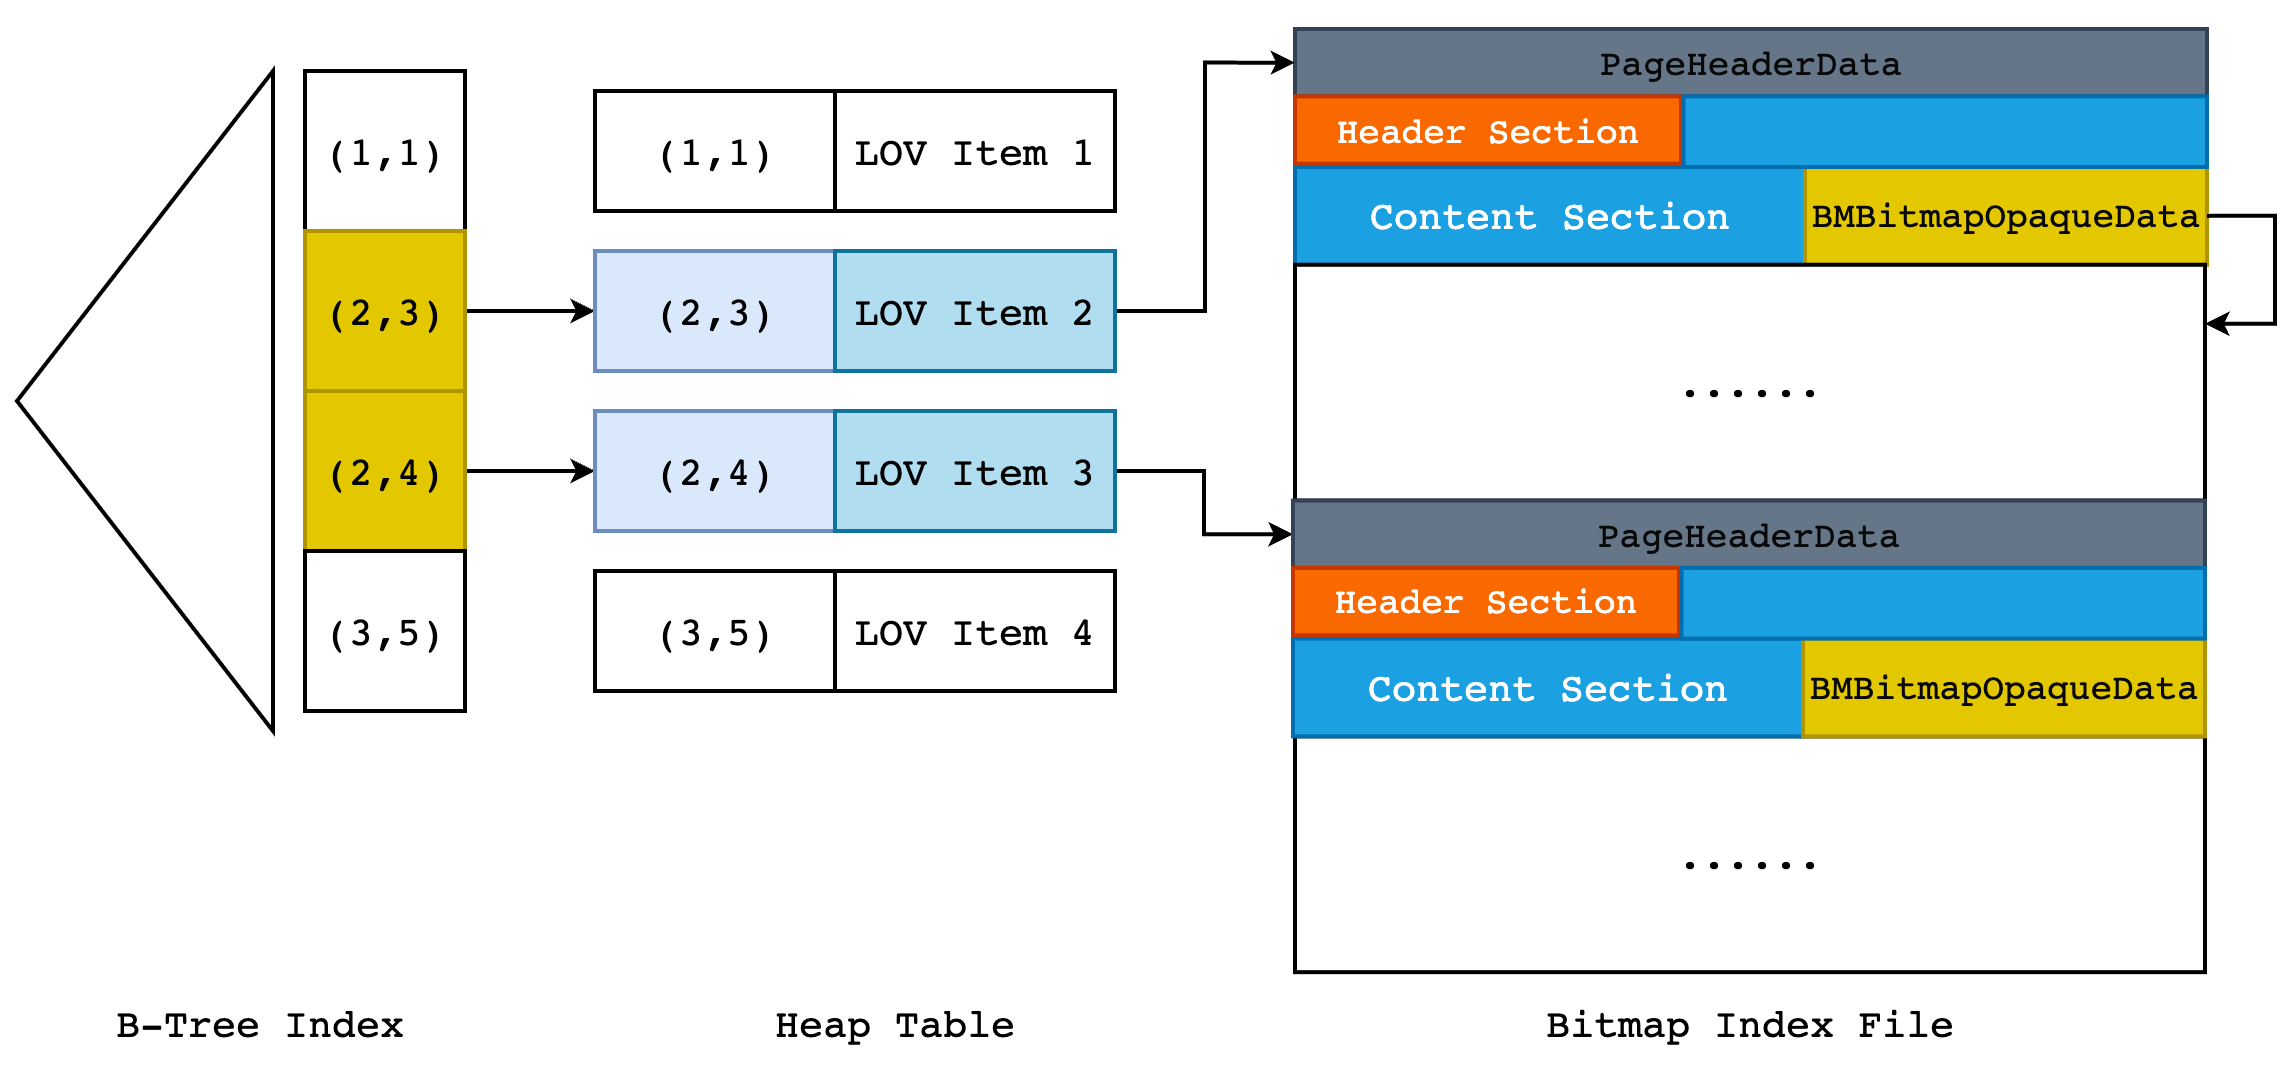
2.3 Bitmap Index 整体存储结构
对于一个 Bitmap 索引来说,每一个唯一值都会有一个 Bitmap List,比如说 City-Shanghai 和 City-Shenzhen,这是两个不同的列值,因此在 Bitmap Index 文件中就至少需要存储 2 个 Bitmap List,如下图所示:
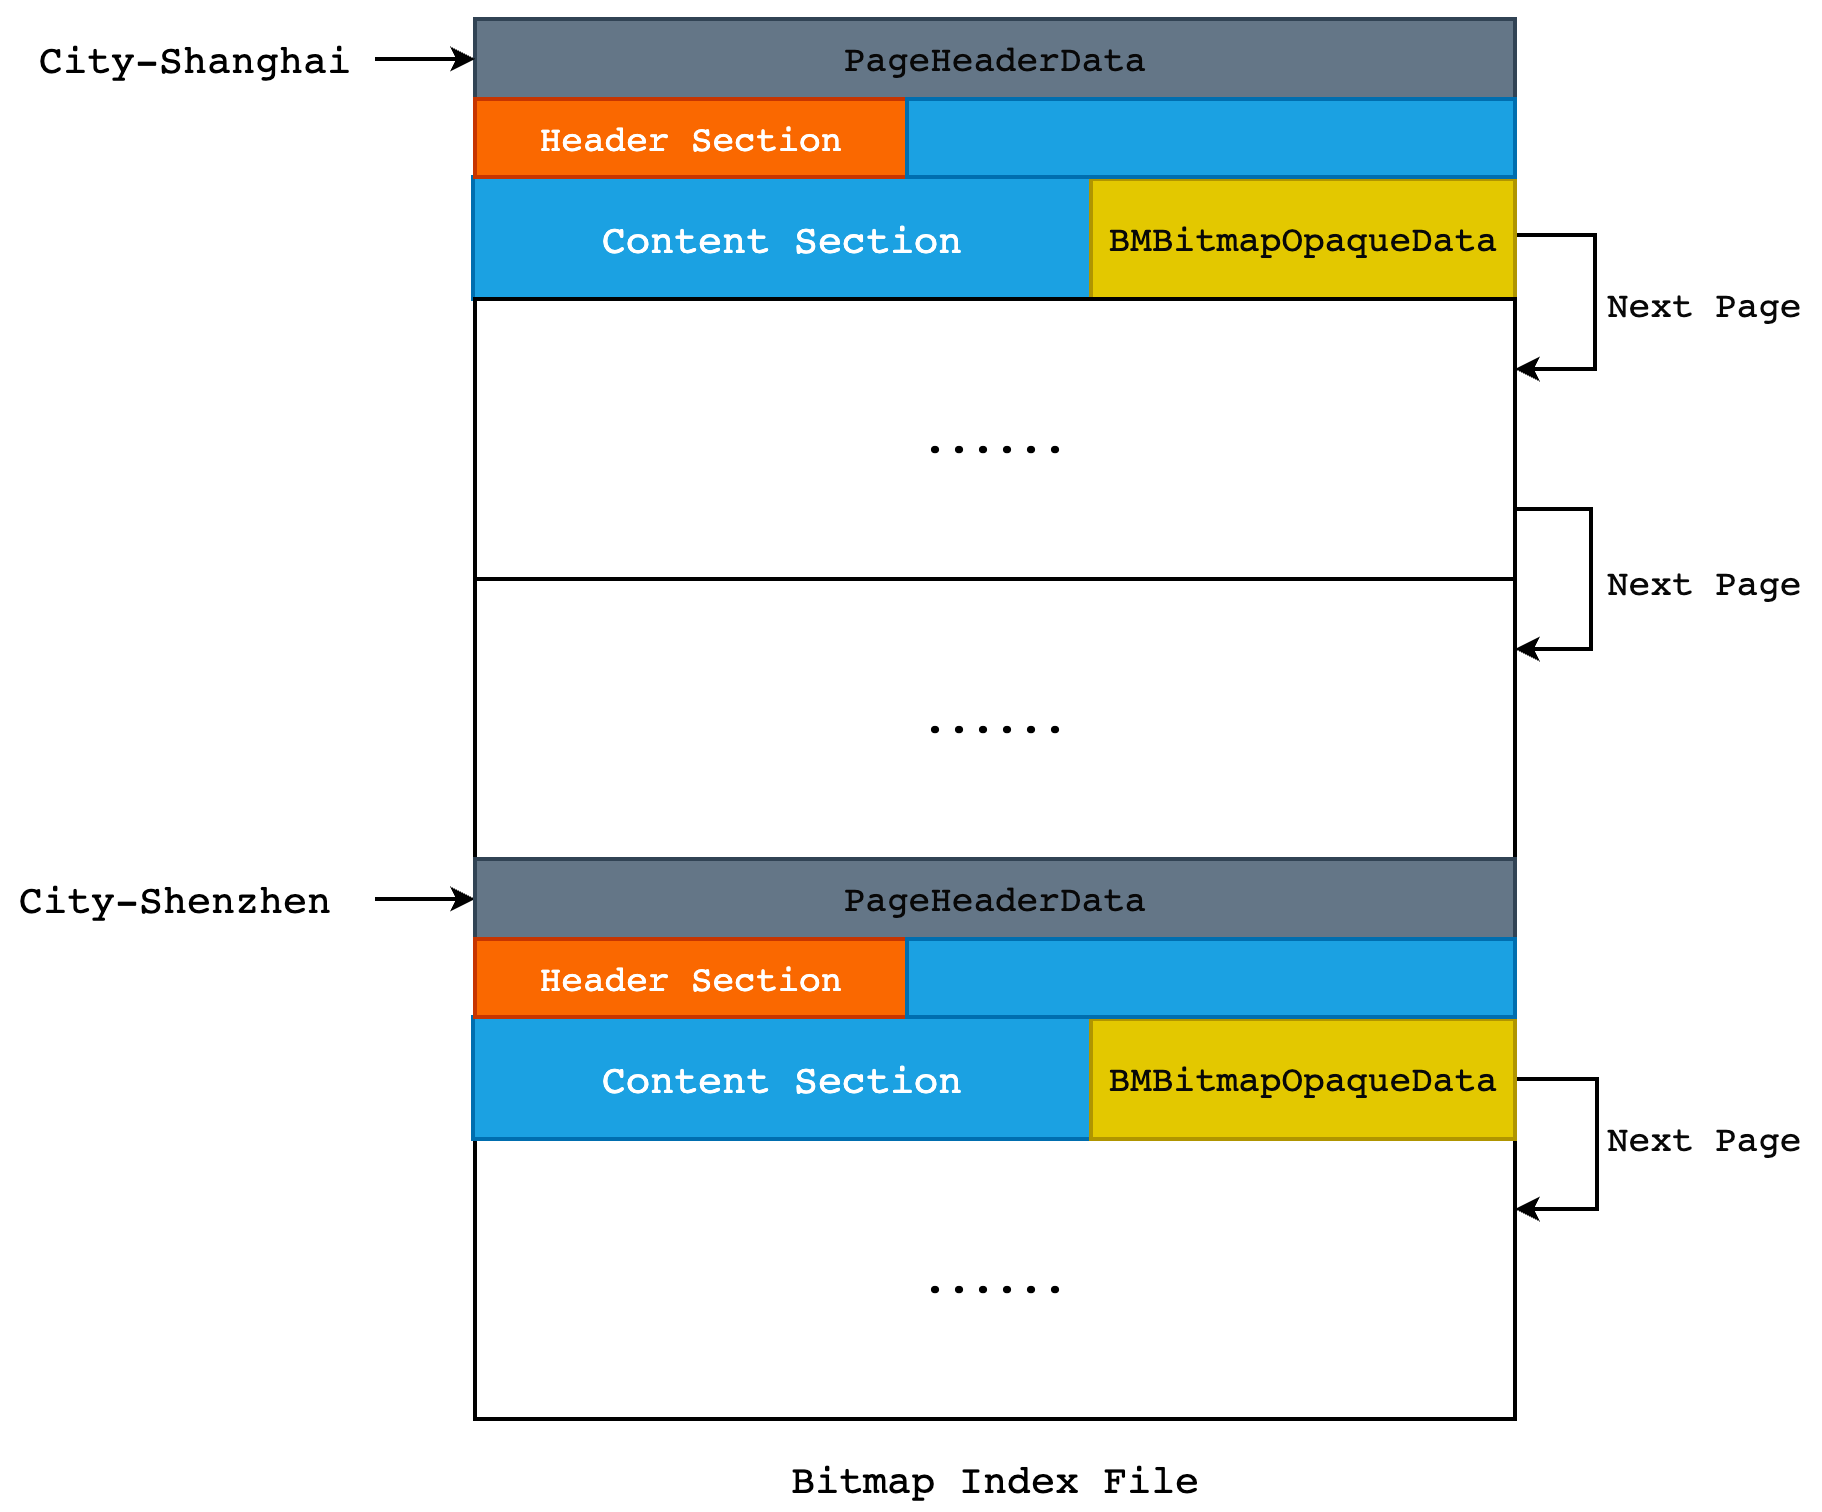
我们可以通过 Next Page 指针快速地找到一个 Bitmap Page 的下一页,但是我们如何找到这个“链表”的起始部分呢? 我们可以把每个 Bitmap List 的起始部分收集起来,放入到一个链表中,当我们需要查找某一个键值对应的 Bitmap 时,遍历这个链表即可。但是当我们索引中的唯一值越来越多时,链表遍历的方式就会比较低效,那么我们就可以考虑把键值和其对应的 Bitmap List Header 位置放到一棵 B-Tree 中,加速查找过程。
但是由于 PostgreSQL 中只有 Heap Table 的 B-Tree API 是现成的,也就是说我们需要再建立一张 heap table,然后保存 key->Bitmap Index First Page 的映射,再在 key 上建立 B-Tree Index。同时,为了优化 Bitmap Index 的写入效率以及更好的管理 Bitmap Index,Greenplum 额外引入了另一个结构体: BMLOVItemData。
LOV 是 List Of Value 缩写,也就是字段上的唯一值数组。一个 LOVItem 表示唯一值数组中的某一个具体唯一值,比如 City-Shanghai。在 BMLOVItemData 中保存了 Bitmap Index 的第一页和最后一页,同时保存了 Bitmap Index 的最后一个字,用来优化尾部更新的效率。因此在 heap table 中,保存的是 key->LOV Item 之间的映射关系,而在 LOV Item 中才实际保存了指向 Bitmap Index First Page 的指针,B-Tree 则用于优化 Key 到 LOV Item 的查找效率。整体结构如下图所示:
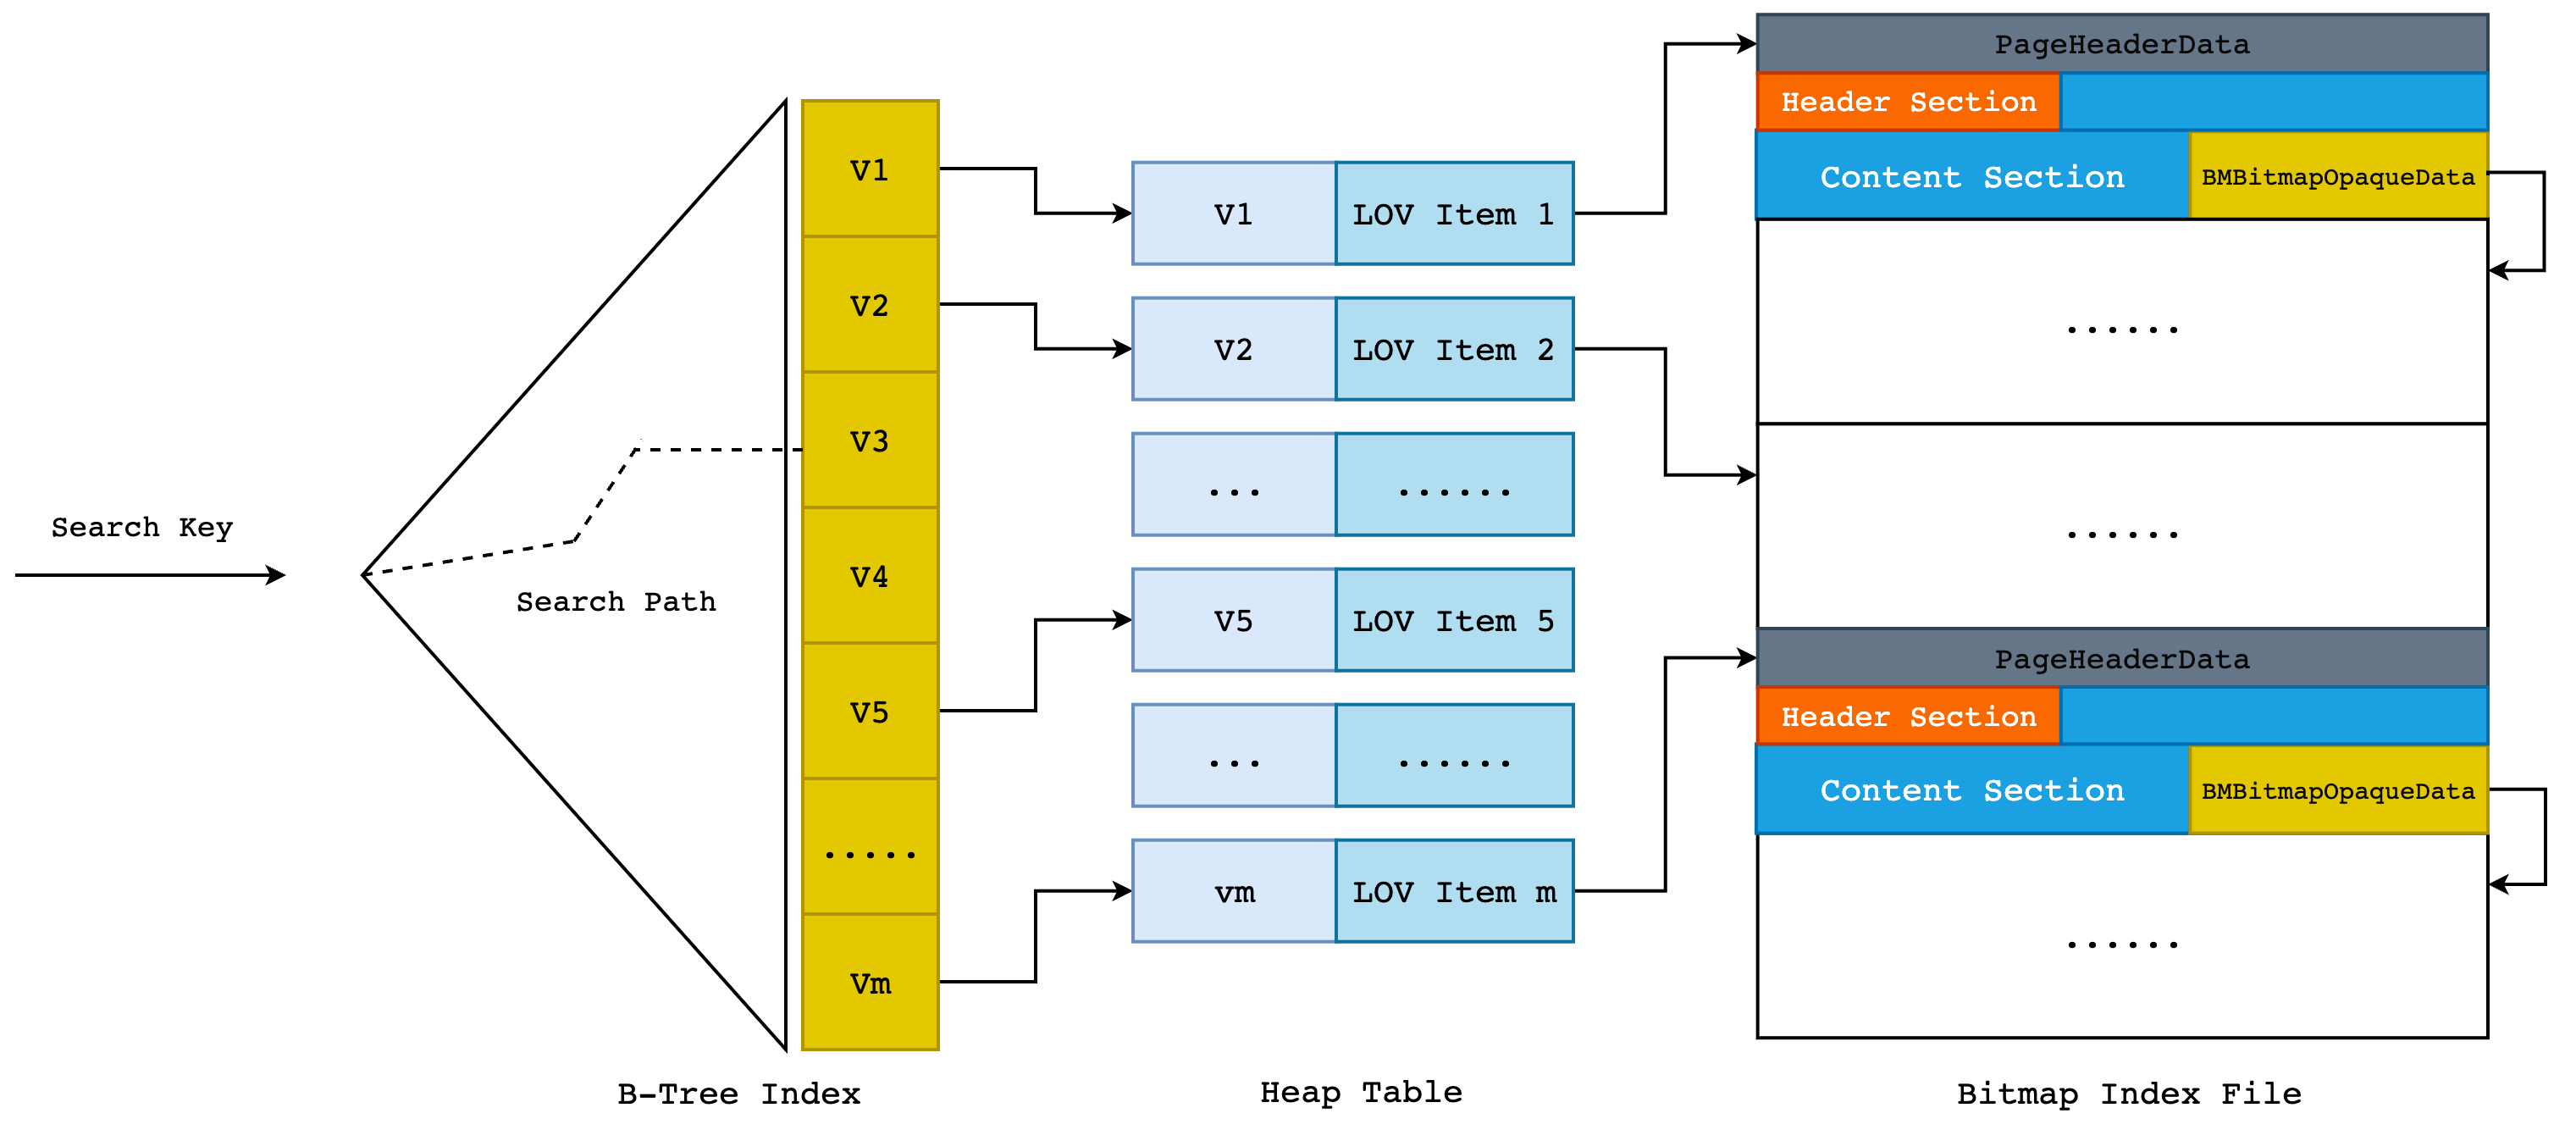
也就是说,当我们使用 Bitmap Index 来执行
select * from person where city = 'Shenzhen';
时,首先会使用 “Shenzhen” 这个 Key 在 B-Tree Index 中查找 LOV 项的 TID,然后以此 TID 在 heap table 中找到具体的 tuple,从而取出 LOV 项,再根据 LOV 项的 Bitmap List Header 找到 “Shenzhen” 这个 Key 所在的第一个索引页,然后开始读取 Bitmap Index Page。这里依旧遵循火山模型的”One-Tuple-At-A-Time”,每次向上层节点返回一个 TID。当该页面所有的 words 都被读完时,根据 Next Page 指针找到下一页继续读取,直到没有更多的索引页为止。
2.4 至关重要的 LOV Item
LOV 项在 Bitmap 索引中起到了非常重要的作用,它不仅仅保存了每个 Bitmap List 的起始位置,同时还起到了优化查询和插入速度的作用,现在就来看看其具体实现:
typedef struct BMLOVItemData  {
    /* Bitmap List 的起始和结束页面 BlockNumber */
    BlockNumber		bm_lov_head;
    BlockNumber 	bm_lov_tail;

    /* Bitmap Index 的最后一个完整字,由于优化尾部插入 */
    BM_HRL_WORD		bm_last_compword;
    /* Bitmap Index 的最后一个字,由于优化尾部插入 */
    BM_HRL_WORD		bm_last_word;

    /* bm_last_compword 中最后一位(bit)对应的 tid location */
    uint64			bm_last_tid_location;

    /* 最后一个设置为 1 的位对应的 tid location */
    uint64			bm_last_setbit;

    /* bm_last_compword 和 bm_last_word 的压缩字标识 */
    uint8			lov_words_header;

} BMLOVItemData;
typedef BMLOVItemData *BMLOVItem;
部分字段的详细解释如下:
bm_last_compword和bm_last_word: a. 这两个字段是用来优化 Bitmap Index 的尾部插入(实际上为更新)的。对于 OLAP 型的应用来说,数据极少被删除,因此 tuple 的 tid 是递增的。那么相较于更新 bitmap page,直接更新 LOV 项的效率更高(无需打开 Bitmap Index 文件)。因此,在读取 bitmap 向量时,最后还要把 LOV 项的这两个字一起读上,否则数据将不完整。 b. 随着尾部插入的进行,当bm_last_word变成一个完整的字时,将会被合并进bm_last_compword中。bm_last_setbit: 在 bitmap 向量尾部插入的时候,可以通过这个字段来直接确定中间有多少个 0(如果可能,这些 0 将会被进行压缩处理)lov_words_header: 表示bm_last_word和bm_last_compword是否为压缩字。其值为 1 时表示bm_last_word是一个压缩字,值为 2 时则表示bm_last_compword是压缩字。
3. Bitmap Index 读取过程
Bitmap Index 的读取过程要比写入过程简单许多,从读取形式上可以分为两种: 每次返回一个 tuple,以及返回一个 bitmap stream。每次返回一个 tuple 用于索引扫描,即 Index Scan;返回 bitmap stream 则用于 Bitmap Index Scan。我们可以用两个简单的查询语句来触发 Index Scan 和 Bitmap Index Scan:
-- Index Scan
postgres=# explain (analyze, costs off, timing off, summary off)
select * from test_bitmap where foo = 52;
                                      QUERY PLAN
---------------------------------------------------------------------------------------
 Gather Motion 3:1  (slice1; segments: 3) (actual rows=99938 loops=1)
   ->  Index Scan using test_bitmap_foo_idx on test_bitmap (actual rows=33488 loops=1)
         Index Cond: (foo = 52)
 Optimizer: Postgres query optimizer
(4 rows)


-- Bitmap Index Scan
postgres=# explain (analyze, costs off, timing off, summary off)
select * from test_bitmap where foo = 52 or bar = 520;
                                     QUERY PLAN
------------------------------------------------------------------------------------
 Gather Motion 3:1  (slice1; segments: 3) (actual rows=109896 loops=1)
   ->  Bitmap Heap Scan on test_bitmap (actual rows=36763 loops=1)
         Recheck Cond: ((foo = 52) OR (bar = 520))
         ->  BitmapOr (actual rows=1 loops=1)
               ->  Bitmap Index Scan on test_bitmap_foo_idx (actual rows=1 loops=1)
                     Index Cond: (foo = 52)
               ->  Bitmap Index Scan on test_bitmap_bar_idx (actual rows=1 loops=1)
                     Index Cond: (bar = 520)
 Optimizer: Postgres query optimizer
(9 rows)
3.1 Index Scan
首先来看下 Index Scan 的执行流程以及大致的函数调用栈,如下图所示:
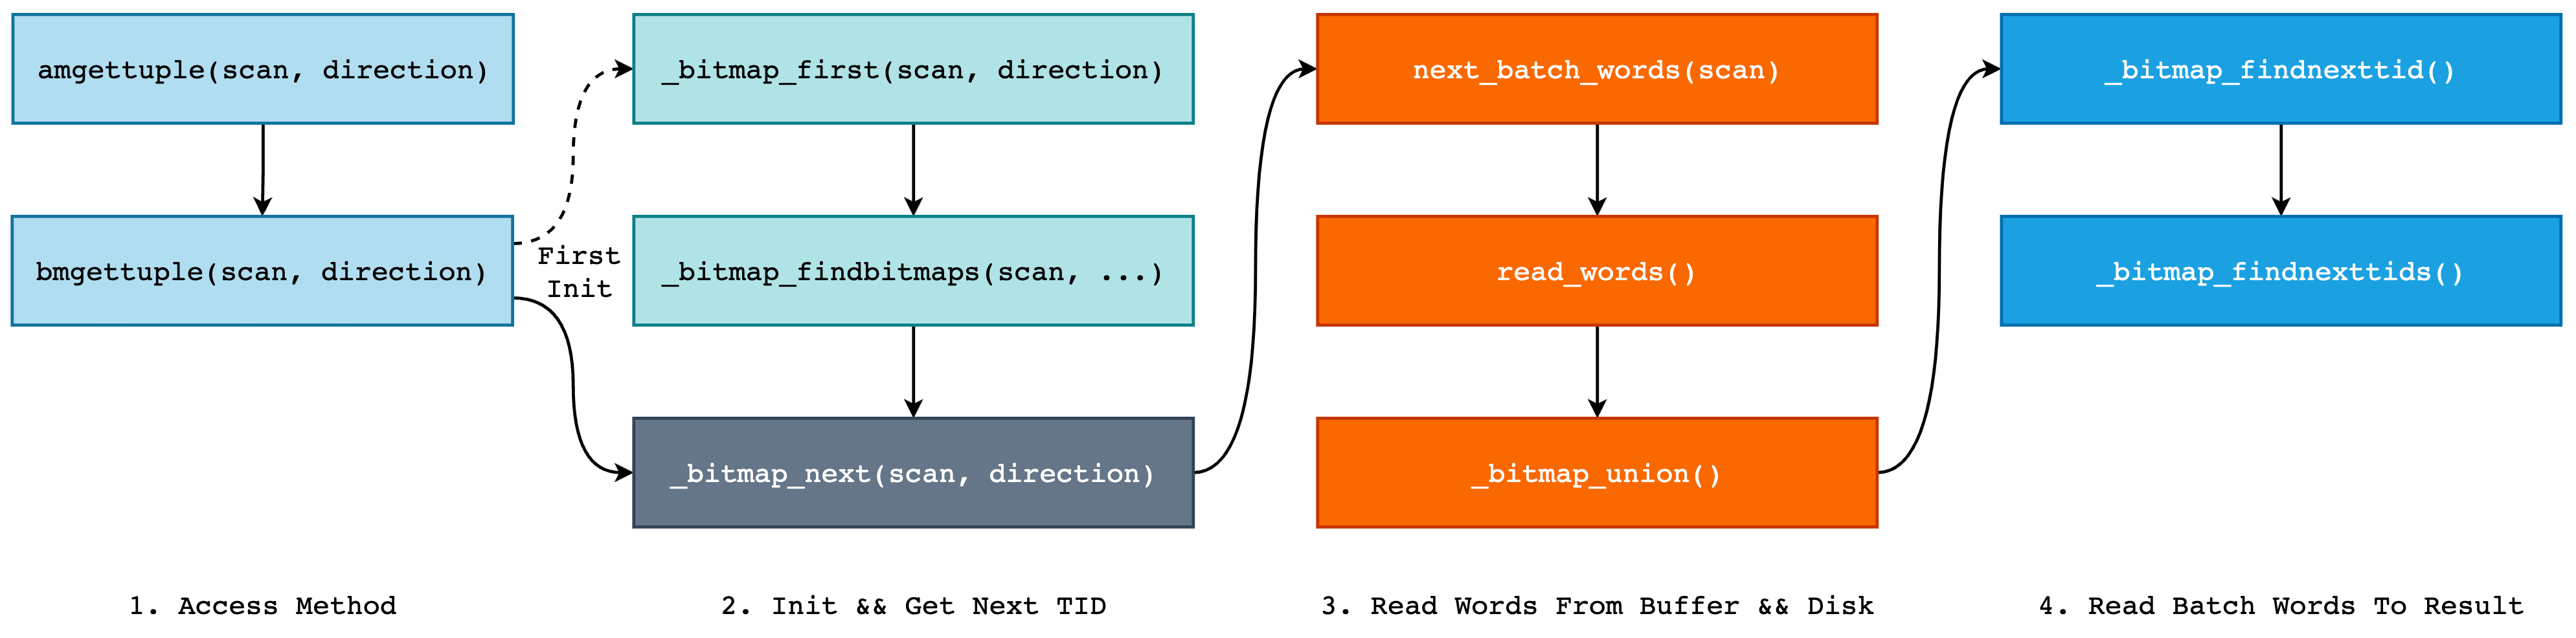
整体可以分为 4 大部分:
- 最外层自然是 AM,即 Access Method 部分,是 PostgreSQL 对数据访问方式的一种抽象,我们可以简单地理解为一种多态。Bitmap Index 使用
bmgettuple()每次向上层调用返回一个 tuple,在第一次调用时将调用_bitmap_first()完成初始化工作,而后不断调用_bitmap_next()返回结果; - 第二部分则是为索引扫描进行的初始化工作,例如打开 B-Tree 索引和 LOV Heap Table,根据扫描 Key 找到所有的 LOV Item,以及为在扫描过程中需要的结构体分配内存空间等。在所有事情准备完毕后,即可开始调用
_bitmap_next开始扫描 Bitmap Words 了。 - 当我们开始扫描 Bitmap Words 时,将对应的 Page 读取到 Buffer Pool 中,并将对应的 Header Section 和 Content Section 赋值给结构体
BMBatchWords。同时,如果扫描 Key 对应了多条 Bitmap List 的话,还需要将所有的 bitmap 进行 OR 操作,即_bitmap_union。 - 最后,由
BMIterateResult对BMBatchWords中的压缩字和非压缩字进行读取,将结果保存在BMIterateResult->nextTids数组中,提供给上层调用下一条 tuple。我们可以将BMBatchWords看做是一个巨大的,带有压缩的沙场,BMIterateResult则是小型运沙卡车,每次从沙场铲一铲子被压缩过的沙子,并进行解压缩放在车斗中,然后再运输到其它地方。
接下来就是非常细致的代码流程了,不感兴趣的读者可以直接跳过,由于 Bitmap Index 引入了 heap table 和与之对应的 B-Tree 索引,同时还对 bitmap 进行了压缩,这使得读取 TID 的过程异常复杂。
首先来看 bmgettuple(),这是 Bitmap Index 对外提供的 Access Mothod,该方法需要返回是否还存在下一个 tuple,并将扫描到的 tuple tid 放到 scan->xs_heaptid 中:
bool bmgettuple(IndexScanDesc scan, ScanDirection dir) {
    BMScanOpaque  so = (BMScanOpaque) scan->opaque;
    bool		res;

    /* This implementation of a bitmap index is never lossy */
    scan->xs_recheck = false;

    if (so->bm_currPos && so->cur_pos_valid)
        res = _bitmap_next(scan, dir);
    else
        res = _bitmap_first(scan, dir);

    return res;
}
当我们第一次调用 bmgettuple 时,BMScanOpaque 并没有进行初始化,因此会调用 _bitmap_first 进行初始化:
bool _bitmap_first(IndexScanDesc scan, ScanDirection dir) {
    BMScanOpaque so;
    BMScanPosition scanpos;

    /* 使用 _bitmap_findbitmaps 找到所有满足查询 Key 的 Bitmap Vector */
    _bitmap_findbitmaps(scan, dir);

    so = (BMScanOpaque) scan->opaque;
    scanpos = (BMScanPosition) so->bm_currPos;
    if (scanpos->done)
        return false;

    return _bitmap_next(scan, dir);
}
而对于 _bitmap_findbitmaps 函数来说,其主要工作就是根据 Scan Key 从 B-Tree 索引中找出所有符合条件的 tuple,然后根据对应的 Block Number 和 Offset 取出所有的 LOV 项,并构建 BMVector 数组:
void _bitmap_findbitmaps(IndexScanDesc scan, ScanDirection dir) {
    BMScanOpaque			so;
    BMScanPosition			scanPos;
    Buffer					metabuf;
    BMMetaPage				metapage;
    BlockNumber				lovBlock;
    OffsetNumber			lovOffset;
    bool					blockNull, offsetNull;
    int						vectorNo, keyNo;

    so = (BMScanOpaque) scan->opaque;

    if (so->bm_currPos == NULL)
        so->bm_currPos = (BMScanPosition) palloc0(sizeof(BMScanPositionData));

    scanPos = so->bm_currPos;

    /* 初始化扫描结果的 nextTid 为 1 */
    scanPos->bm_result.nextTid = 1;

    /* 获取 Bitmap Index 的 Meta Page */
    metabuf = _bitmap_getbuf(scan->indexRelation, BM_METAPAGE, BM_READ);
    metapage = _bitmap_get_metapage_data(scan->indexRelation, metabuf);

    Relation		lovHeap, lovIndex;
    ScanKey			scanKeys;
    IndexScanDesc	scanDesc;
    List*			lovItemPoss = NIL;
    ListCell		*cell;

    /* 打开 B-Tree Index 以及 LOV heap table */
    _bitmap_open_lov_heapandindex(scan->indexRelation, metapage, &lovHeap, &lovIndex, AccessShareLock);

    scanKeys = palloc0(scan->numberOfKeys * sizeof(ScanKeyData));

    /* 开始扫描 B-Tree 索引 */
    scanDesc = index_beginscan(lovHeap, lovIndex, GetActiveSnapshot(), scan->numberOfKeys, 0);
    index_rescan(scanDesc, scanKeys, scan->numberOfKeys, NULL, 0);

    /* 找到所有符合过滤条件的 LOV 项 */
    while (true) {
        ItemPos			*itemPos;

        /* 通过 lovHeap 和 lovIndex 获取到 LOV 的 BlockNumber 和 Offset,并保存到
         * lovBlock 和 lovOffset 中 */
        bool res = _bitmap_findvalue(lovHeap, lovIndex, scanKeys, scanDesc,
                                     &lovBlock, &blockNull, &lovOffset,
                                     &offsetNull);

        if (!res) return;

        itemPos = (ItemPos*)palloc0(sizeof(ItemPos));
        itemPos->blockNo = lovBlock;
        itemPos->offset = lovOffset;
        lovItemPoss = lappend(lovItemPoss, itemPos);

        scanPos->nvec++;
    }

    if (scanPos->nvec)
        scanPos->posvecs = (BMVector)palloc0(sizeof(BMVectorData) * scanPos->nvec);

    vectorNo = 0;

    /* 逐一遍历所有的 lovItemPoss 项,取出每一个 LOV Item */
    foreach(cell, lovItemPoss) {
        ItemPos		*itemPos = (ItemPos*)lfirst(cell);

        BMVector bmScanPos = &(scanPos->posvecs[vectorNo]);
        init_scanpos(scan, bmScanPos, itemPos->blockNo, itemPos->offset);
        vectorNo++;
    }

    list_free_deep(lovItemPoss);

    index_endscan(scanDesc);
    _bitmap_close_lov_heapandindex(lovHeap, lovIndex, AccessShareLock);
    pfree(scanKeys);

    _bitmap_relbuf(metabuf);

    /*
     * 当只有一个 bitmap vector 时,scanPos->bm_batchWords 和 posvecs->bm_batchWords 数组头指针相等;
     * 当存在多个 bitmap vector 时,为 scanPos->bm_batchWords 分配内存空间并初始化,这里的 bm_batchWords
     * 就是前面我们所提到的沙场。
     */
    if (scanPos->nvec == 1)
        scanPos->bm_batchWords = scanPos->posvecs->bm_batchWords;
    else {
        scanPos->bm_batchWords = (BMBatchWords *) palloc0(sizeof(BMBatchWords));
        _bitmap_init_batchwords(scanPos->bm_batchWords, BM_NUM_OF_HRL_WORDS_PER_PAGE, CurrentMemoryContext);
    }
}
_bitmap_findbitmaps 函数比较复杂,首先是打开 B-Tree Index 和 heap table,然后根据 Scan Key 从 B-Tree 索引中找出所有符合条件的 tuple,然后根据对应的 Block Number 和 Offset 从 heap table 取出所有的 LOV 项,并构建 BMVector 数组:
typedef struct BMVectorData {
    Buffer          bm_lovBuffer;   /* BufferPool 中的 Buffer No */
    OffsetNumber    bm_lovOffset;   /* Buffer Page 的偏移量 */

    /* 记录下一个要扫描的 Bitmap Page Block Number */
    BlockNumber     bm_nextBlockNo; /* the next bitmap page block */

    bool            bm_readLastWords;
    BMBatchWords    *bm_batchWords;  /* 该字段将记录从硬盘中扫描上来的 Bitmap Words Page */
} BMVectorData;
typedef BMVectorData *BMVector;
首先来看为什么我们需要一个 BMVector 数组,当我们使用 create index on t using bitmap(b); 创建索引时,不是根据列 b 的唯一值来创建 LOV 项的吗? 例如当我们向表 t 中插入一些数据之后:
create table t (a int, b int, c int) distributed by (a);
create index idx1 on t using bitmap(b);

insert into t values (1, 1, 1);
insert into t values (1, 2, 1);
insert into t values (1, 3, 4);
此时列 b 只有 “1, 2, 3” 这 3 个唯一值,那么当我们查询 select * from t where b = 2; 时,只会从 B-Tree 中找到一个结果,也就是说 LOV 项只有 1 个,那么为什么我们还需要一个数组? 原因就在于当 bitmap index 中包含多列时,查询单列时就会返回不止一个结果:
create table t (a int, b int, c int) distributed by (a);
create index idx1 on t using bitmap(b, c);

insert into t values (1, 1, 1);
insert into t values (1, 2, 3);
insert into t values (1, 2, 4);
insert into t values (1, 3, 5);
此时,我们再使用 select * from t where b = 2; 进行查询时,B-Tree 就会返回 2 个结果,分别为 “(2, 3)” 和 “(2, 4)”,而这对应了两个 LOV 项,也就是两个 Bitmap Vector,所以我们才需要使用一个数组来保存 LOV 数据以及对应的 Bitmap Batch Words 数据,如下图所示:
这种情况只会出现在多列的 Bitmap 索引上,对于单列索引来说,永远只会扫描一条 Bitmap Vector。
回归正题,当初始化准备工作做完之后,就可以开始正式的 Bitmap Words 扫描了,即调用 _bitmap_next:
bool _bitmap_next(IndexScanDesc scan, ScanDirection dir) {
    BMScanOpaque	so;
    BMScanPosition	scanPos;
    uint64			nextTid;

    so = (BMScanOpaque) scan->opaque;
    scanPos = so->bm_currPos;

    /* 若扫描已经结束,则直接返回 false,表示没有下一条 tuple 了 */
    if (scanPos->done) return false;

    for (;;) {
        /* 当 Batch Words 中没有多余的 Word 可读时,就需要获取新的 Batch Words */
        if (scanPos->bm_batchWords->nwords == 0 &&
            scanPos->bm_result.nextTidLoc >= scanPos->bm_result.numOfTids) {
            _bitmap_reset_batchwords(scanPos->bm_batchWords);
            scanPos->bm_batchWords->firstTid = scanPos->bm_result.nextTid;

            /* 获取下一批数据,不一定需要读取新的 bitmap page (在有多个 bitmap vector 的情况下) */
            next_batch_words(scan);

            _bitmap_begin_iterate(scanPos->bm_batchWords, &(scanPos->bm_result));
        }

        /* 同上 */
        if (scanPos->done) return false;

        /* 获取下一个 TID */
        nextTid = _bitmap_findnexttid(scanPos->bm_batchWords, &(scanPos->bm_result));

        if (nextTid == 0) continue;
        else break;
    }

    /* 将结果写入至 scan->xs_heaptid 供上层调用使用 */
    ItemPointerSet(&(scan->xs_heaptid), BM_INT_GET_BLOCKNO(nextTid), BM_INT_GET_OFFSET(nextTid));
    so->cur_pos_valid = true;

    return true;
}
现在,我们就需要揭开 BMBatchWords 和 BMIterateResult 这两个在 Bitmap Index 扫描中最为重要的两个数据结构了。对于一般的索引扫描来说,我们只需要记录下当前扫描到的位置即可,下一次扫描时从记录的位置开始继续扫描即可。但是对于 Bitmap Index 来说,情况要复杂许多,原因就在于 HRL 压缩编码。
首先来看下 BMBatchWords 和 BMIterateResult 这两个结构之间的大体关系:
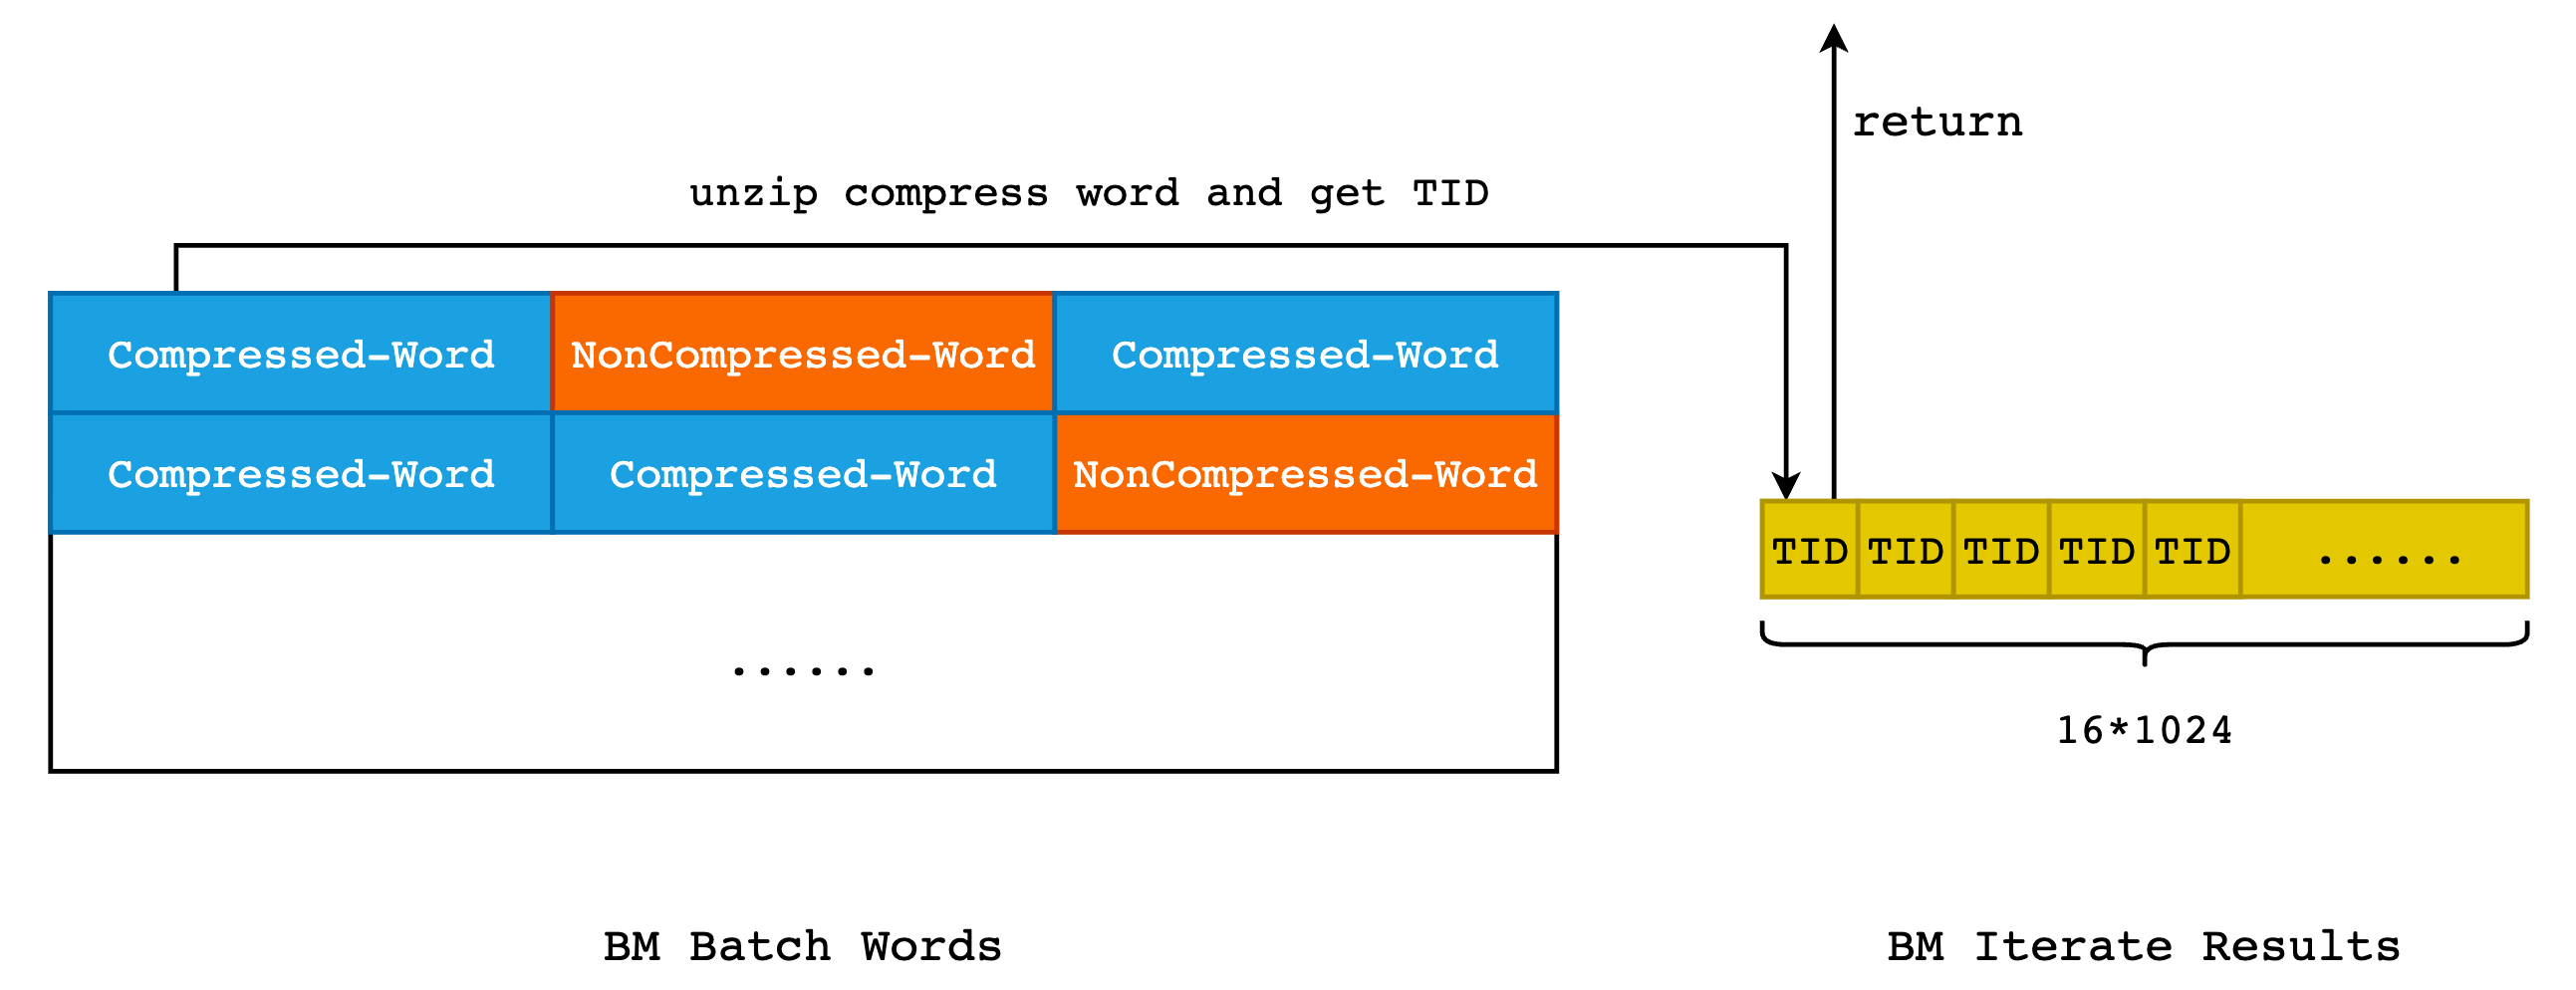
如上图所示,在 BMBatchWords 中,最为重要的数据就是经过 HRL 压缩编码之后的 Bitmap Word,这些 bitmap 将会由 Iterate Reuslts 进行解压缩,而后将 TID 保存在 nextTID 数组中,这个数组的长度固定,默认为 16 * 1024 = 16384。而对于 Batch Words 来说,默认可存储 3968 个字,由于一个字的长度为 64 bit,那么所有的 Word 都是未压缩的情况下,可存储 3968 * 64 = 253952 个 TID,当所有的字都是压缩字的话,一个 Batch Word 就可以保存 3968 * (2 ^ 63) 个 TID,而这将是一个天文数字。因此,在最好的情况下,Iterate Restult 至少需要扫描同一个 Batch Word 两次,才能取得所有的 TID。
/* BMIterateResult 用于保存扫描 BMBatchWords 的结果,BMBatchWords 其实就是 Bitmap Pages 的内存存储形式 */
typedef struct BMIterateResult {
    /* result->nextTid 中保存了下一个需要从 Batch Words 中取出的 TID */
    uint64	nextTid;

    /*
     * lastScanWordNo 表示在当前扫描中,需要读取 Batch Words 中的第几个字,从 0 开始;
     * lastScanPos 则表示需要读取 cwords[lastScanWordNo] 的第几个 bit 位,从 0 开始。
     */
    uint32	lastScanWordNo;
    uint32	lastScanPos;

    /* TID 结果数组,用于向上层调用返回 TID,最多可保存 16*1024 个结果 TID */
    uint64	nextTids[BM_BATCH_TIDS];

    /* 当前已经保存的 TID 数量,其值必然小于 16384 */
    uint32	numOfTids;

    /* 调用方需要读取的 TID 在 nextTids 数组中的位置,从 0 开始 */
    uint32	nextTidLoc; /* the next position in 'nextTids' to be read. */

    uint64	markedTid;
} BMIterateResult;
由于 nextTids 只能装下 16384 个 TID,因此我们需要记录下在当前扫描中 Result 在当前扫描中扫到了 Batch Words 的第几个 Word 第几个 Bit,下一次重新扫描同一个 Batch Words 时就需要从此处重新开始。
typedef struct BMBatchWords {
    uint32	maxNumOfWords;  /* 当前 Batch Words 所能保存的最大 Word 数量 */

    /* nwordsread 和 nextread 用于 _bitmap_union 函数中 */
    uint64	nwordsread;
    uint64	nextread;

    /* 下面 3 个参数与扫描相关 */
    uint64	firstTid;
    uint32	startNo;
    uint32	nwords;

    /* BMBatchWords 中存储的 HRL Bitmap 数据,hwords 为 header words,cwords 为 content words */
    BM_HRL_WORD *hwords;
    BM_HRL_WORD *cwords;
} BMBatchWords;
当 Batch Word 中不存在剩余的字或者是 Result 已经装满时,就可以停止装填数据的过程:
uint64 _bitmap_findnexttid(BMBatchWords *words, BMIterateResult *result) {

    /* 当 result 中没有数据可读时,从 Batch Words 中重新装填数据 */
    if (result->nextTidLoc >= result->numOfTids)
        _bitmap_findnexttids(words, result, BM_BATCH_TIDS);

    /* 当 result 中还存在数据时,继续从 result->nextTids 数组中取数据 */
    if (result->nextTidLoc < result->numOfTids) {
        result->nextTidLoc++;
        return (result->nextTids[result->nextTidLoc-1]);
    }

    /* no more tids */
    return 0;
}
所以,_bitmap_findnexttids 其实就是从 Batch Words 中读取数据到 Iterate Result 中,其中最为重要的步骤就是将压缩过的字进行解压缩:
void _bitmap_findnexttids(BMBatchWords *words, BMIterateResult *result, uint32 maxTids) {
    bool done = false;

    /*
     * 初始化扫描结果,开始一次新的扫描。
     * 此时 result->nextTid 中已经没有数据,因此调用方下一次获取数据时,应当从数组的起始位置开始。
     */
    result->nextTidLoc = result->numOfTids = 0;

    /* 当 result->lastScanWordNo 和 words->startNo 的值相等时,表示我们读取了一个新的 Batch Words,
     * 此时我们需要确定该 Words 的 firstTid 和 result->nextTid 是否相同。如果不相同,说明存在并发
     * 插入,并且当前 Batch Words 中存在上一页的数据,我们需要调整 lastScanWordNo。
     */
    if (result->lastScanWordNo == words->startNo && words->firstTid < result->nextTid)
        _bitmap_catchup_to_next_tid(words, result);

    /* 当 words 中还有剩余的字可读,同时扫描的 TID 数量未达到 maxTids 时,不断扫描 Batch Words */
    while (words->nwords > 0 && result->numOfTids < maxTids && !done) {
        uint8 oldScanPos = result->lastScanPos;

        /* 获取当前要读取的字 */
        BM_HRL_WORD word = words->cwords[result->lastScanWordNo];

        /*
         * if we begin to read a new word, and the word is compressed with zero or the word itself is zero,
         * we can skip over one or more words directly.
         * 如果当前读取的位置是一个新的 word 的起始位置,并且该 word 为 0,那么我们就可以直接跳过这部分数据
         */
        if (oldScanPos == 0 && ((IS_FILL_WORD(words->hwords, result->lastScanWordNo) &&
              GET_FILL_BIT(word) == 0) || word == 0)) {

            BM_HRL_WORD	fillLength;
            if (word == 0)          /* 非压缩字的全 0,只需要跳过一个 word */
                fillLength = 1;
            else
                fillLength = FILL_LENGTH(word);

            /* skip over non-matches */
            result->nextTid += fillLength * BM_HRL_WORD_SIZE;
            result->lastScanWordNo++;
            words->nwords--;
            result->lastScanPos = 0;
            continue;
        }
        /* 压缩字,并且是对 1 进行的压缩 */
        else if (IS_FILL_WORD(words->hwords, result->lastScanWordNo) && GET_FILL_BIT(word) == 1) {
            uint64	nfillwords = FILL_LENGTH(word);
            uint8 	bitNo;

            while (result->numOfTids + BM_HRL_WORD_SIZE <= maxTids && nfillwords > 0) {

               /* 解压缩,result->nextTid 中保存了下一个需要访问的 TID,因为一个字中的 TID
                * 肯定是连续的,所以可以直接使用 result->nextTid++ 的方式更新结果 */
                for (bitNo = 0; bitNo < BM_HRL_WORD_SIZE; bitNo++)
                    result->nextTids[result->numOfTids++] = result->nextTid++;

                nfillwords--;

                /* 更新 lastScanWordNo 对应 word 的压缩字数量,可能这一次的 Scan 不足以扫描完
                 * 所有的压缩字,因此需要扣除掉当前压缩字已经扫描的数量 */
                words->cwords[result->lastScanWordNo]--;
            }

            /* 完整的获取了所有(nfillwords)的压缩字的 TID */
            if (nfillwords == 0) {
                /* 压缩字的所有 TID 都被保存在了 result->nextTids 中,更新下一个要访问的字 */
                result->lastScanWordNo++;
                words->nwords--;
                result->lastScanPos = 0;
                continue;
            }
            else {
                /* result 空间不够了,直接返回,等待下一个的扫描 */
                done = true;
                break;
            }
        }
        else {

            /* 非压缩字的情况 */

            if(oldScanPos == 0) oldScanPos = BM_HRL_WORD_SIZE + 1;

            while (oldScanPos != 0 && result->numOfTids < maxTids) {
                BM_HRL_WORD		w;

                if (oldScanPos == BM_HRL_WORD_SIZE + 1)
                    oldScanPos = 0;

                w = words->cwords[result->lastScanWordNo];
                result->lastScanPos = _bitmap_find_bitset(w, oldScanPos);

                /* did we find a bit set in this word? */
                if (result->lastScanPos != 0) {
                    uint64 tid = result->nextTid + result->lastScanPos -1;
                    result->nextTids[result->numOfTids++] = tid;
                }
                else {
                    result->nextTid += BM_HRL_WORD_SIZE;
                    /* start scanning a new word */
                    words->nwords--;
                    result->lastScanWordNo++;
                    result->lastScanPos = 0;
                }
                oldScanPos = result->lastScanPos;
            }
        }
    }
}
到这里,扫描 Bitmap Index 的函数调用栈就到头了,数据已经被保存在了 result->nextTids 数组中,上层函数只需要不断从数组中依次取出其中的数据即可。当 result 被读完就从 Batch Words 中解压缩新的 TID,如果 Batch Words 也读完了,那么就获取下一页的 Bitmap Words,然后继续上述流程,直到将全部 Bitmap 数据读取完毕。
3.2 Bitmap Index Scan
接下来我们来看 Bitmap Index Scan 的过程,它和 Index Scan 最大的不同就是 Bitmap Index Scan 返回的是 Bitmap Stream,而 Index Scan 返回的是 TID。Bitmap Index Scan 通常会和 Bitmap Heap Scan 成对出现。
Bitmap Index Scan 节点会在第一次被执行时就将获取所有满足条件的元组并在位图中标记它们,而其上层节点中都会有特殊的扫描节点(如 Bitmap Heap Scan) 使用该位图来获取实际的元组。
其入口为 pull_stream,首先获取全部的 Bitmap Pages,然后对其进行扫描,过程和 Index Scan 基本类似。
4. Bitmap Index 写入过程
(过于复杂,TODO
5. Bitmap Index 删除过程
和 B-Tree 索引类似,Bitmap 索引的删除操作并不由 delete 语句触发,而是放在了 vacuum 的过程当中。在实现上,采用了重建 Bitmap 索引的方式来实现,由于存在 HRL 编码,如果在原有索引上进行删除,可能会引发连锁反应。因此,重建索引是最佳选择,同时也简化了并发控制和实现逻辑。
6. Bitmap Index 的建立过程
TODO
7. Greenplum Bitmap Index 曾经出现过的问题
7.1 并发读写导致 Iterate Result 读取到上一页的数据
首先,当我们向 Bitmap Index 中写入一个数据时,在底层的索引文件中只会更新对应 TID 的 bit 位,而由于 HRL 压缩编码的存在,当我们更新时可能会导致原有的字扩展成两个或者三个字,以下面的数据为例:
当我们存在一个压缩字,并且其 Content 为 00001011,表示 11 个全 0 的 Word,并且假设该 Word 的起始 TID 为 1。那么假设我们现在需要更新 TID = 51 的 bit 位为 1,那么就需要将压缩字展开,然后找到对应的 bit 位进行更新,然后再将更新后的 Words 使用 HRL 编码再次进行压缩。这里我们假设一个 Word 是 8 位的,便于演示:
# 对 00001011 压缩字进行解压缩,得到 11 个全 0
00000000 00000000 00000000 00000000 00000000 00000000 00000000 ...... 00000000

# 找到 TID = 51 的 bit 位进行更新
00000000 00000000 00000000 00000000 00000000 00000000 00100000 ...... 00000000

# 对结果重新进行 HRL 编码的压缩
00000110(c) 00100000 00000100(c)
可以看到,当我们对压缩字 00001011(c) 进行更新时,结果变成了 00000110(c) 00100000 00000100(c) (“c” 表示 compressed,表示该 word 为压缩字),新增了两个新的 Words。那么正因为这个特性,当我们对某一个 Bitmap Words Page 进行更新时,可能导致新增 Words,而如果此时该页已经没有多余的空间存放新增的字时,就需要把这部分新增的字存放在下一个页面中,那么下一页的数据就需要保持有序的向后移动。
此时,如果有并发读写的话,就会出现问题,如下图所示:
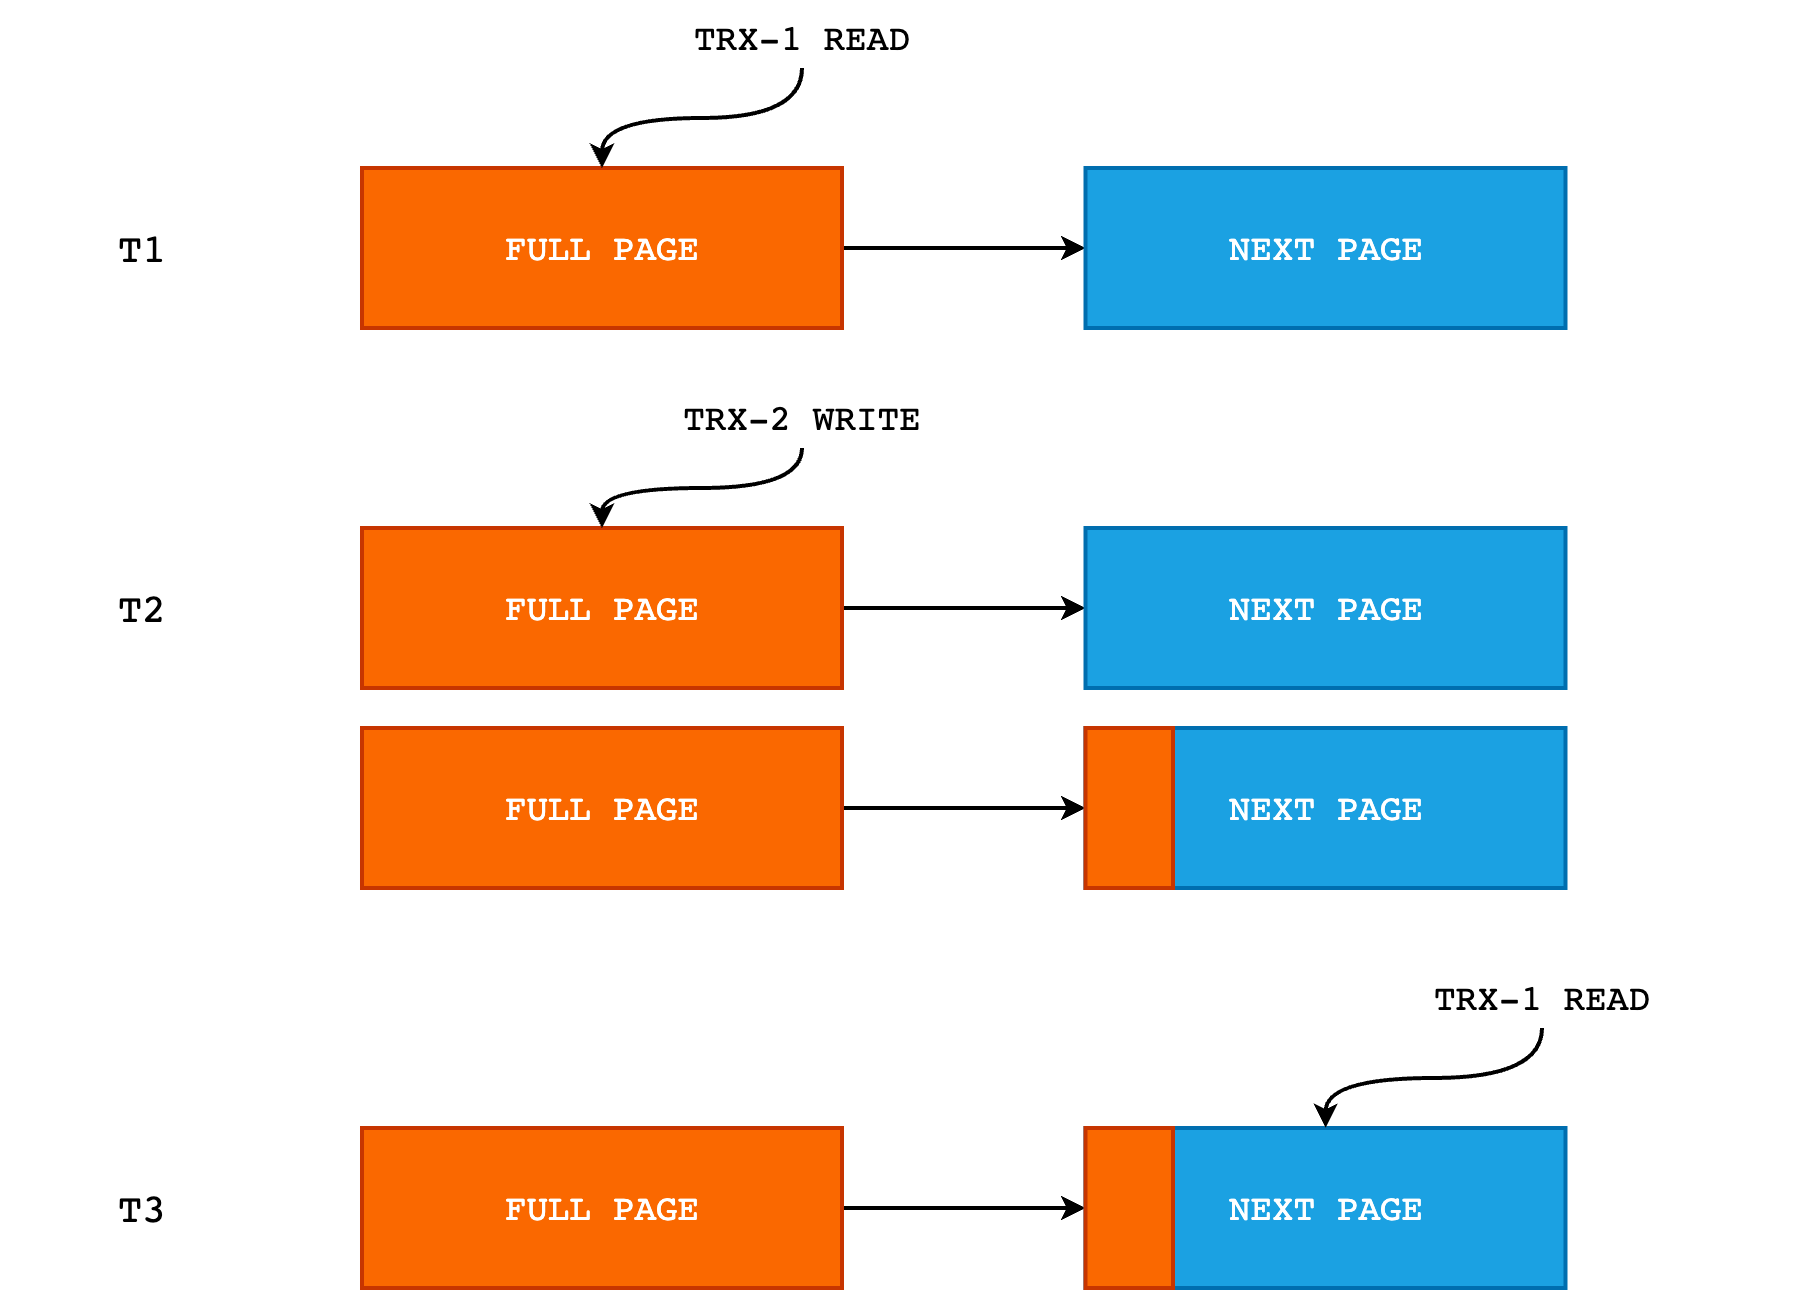
- 在 T1 时刻,TRX-1 正在读取 FULL PAGE,即将文件中的数据页读取到 Batch Words 中,然后由 Iterate Result 进行数据的搬运;
- 在 T2 时刻,TRX-1 已经读取完 FULL_PAGE 并释放了该页的排它锁。此时 TRX-2 更新 FULL PAGE 中的某一位,导致新增了字,这些字被顺序写入到 NEXT PAGE 的起始位置中,如上图中 NEXT PAGE 的橘色部分。
- 在 T3 时刻,TRX-1 对 NEXT PAGE 进行读取,而此时 NEXT PAGE 的起始部分其实已经被上一次的扫描读取过了(这部分数据实际上是 FULL PAGE 的末尾部分),因此如果还是从 NEXT PAGE 的起始位置开始读取的话,就会导致同一份数据被读取两次,导致数据错乱。
这个问题的具体复现过程可见: Data corruption during a bitmap scan,修复可见 #11377。
对这个问题的修复方式也比较简单,result->nextTid 记录了我们下一次需要从 Batch Words 中取出的 TID,而 words->firstTid 则记录了 Batch Words 的第一个 bit 代表的 TID。当我们读取新的 Batch Words 时,如果 result->nextTid 和 words->firstTid 的值不相等的话,就说明存在并发读写,并且上一页的数据扩展到了当前读取的页,那么就需要把这部分数据跳过。